
The best solo build needs an answer for more than a stationary target. It needs to handle crowded rooms, short boss openings, and the moment you realize you've spent too much mana. Our pick is a wand-and-staff Battlemage: a flexible setup that turns wand pressure into deliberate staff damage without demanding a perfect inventory.
Rather than treating rare Enshrouded Items as the starting line, we build around a practical question: what makes the next encounter easier to finish? Below, you'll find a focused skill plan, named armor targets, spell recommendations, and a combat approach that leaves room for mistakes—not just ideal damage windows.
Best Build at a GlanceSkill Priorities: Build a Working Core
For solo progression, our recommendation is a wand-led hybrid with selective staff burst, rather than a staff-only caster or a summon-heavy setup. "Battlemage" describes the playstyle here; it does not mean spending every point in one branch.
The defining mechanic is Blast and Cast: after a wand critical strike, your next staff attack within 10 seconds gains 50% base damage. That is not a permanent 50% increase to your total damage. The accompanying toolkit includes piercing wand heavy attacks, Wand Evasion Attack, and Aerial Wand Attack. For spells, Entangle provides control, Blizzard and Ball Lightning address groups, and Mana Drain replenishes mana from enemies. Eternal spells remove ammunition consumption; they are not a promise of mana-free casting. These are the documented mechanics behind the recommendations in this guide.
| Build Component | Recommended Setup |
|---|---|
| Primary weapon | An upgraded wand suited to the encounter |
| Secondary weapon | An upgraded staff with relevant damage perks |
| Core interaction | Blast and Cast |
| Group-damage option | Blizzard or Ball Lightning |
| Utility option | Entangle |
| Recovery option | Mana Drain |
| Main investment | Magic damage, useful critical chance, sustainable casting |
| Main weakness | Unsafe casting and awkward weapon switching |
This is our choice for players who want flexible solo combat. If you dislike switching weapons or managing several spell options, a more specialized setup may suit you better.
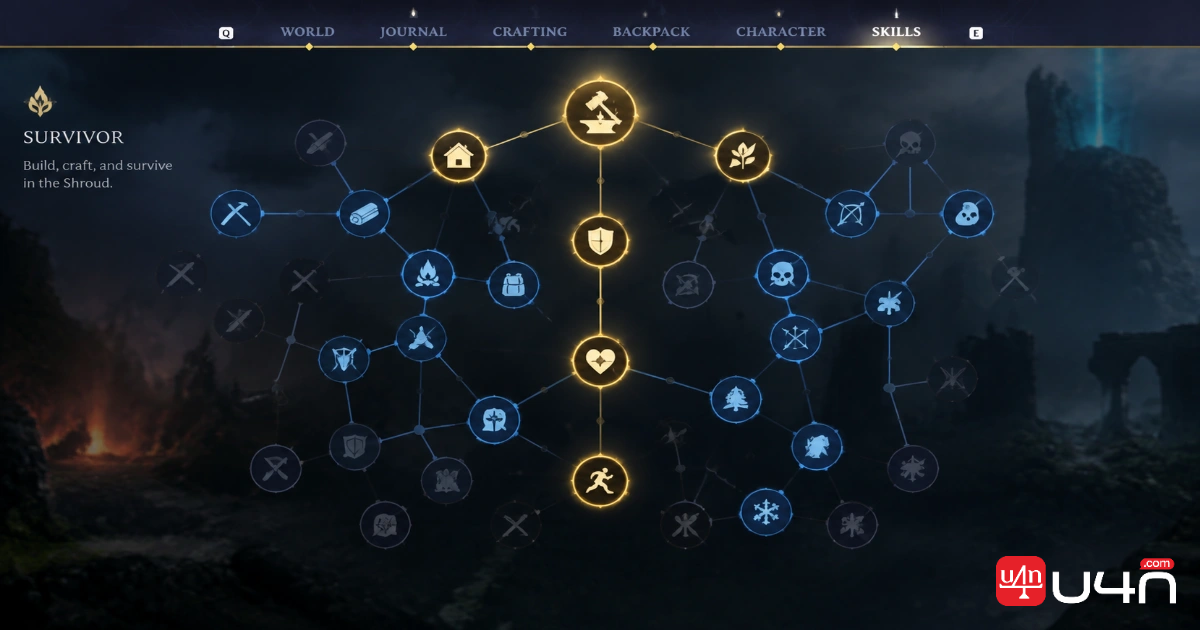
Skill Priorities: Build a Working Core
The mistake to avoid is buying an impressive interaction before you can support it. A staff that barely contributes makes a hybrid damage bonus much less exciting.
Recommended Unlock Order
Use this as an investment sequence, with the connecting nodes shown in your current skill tree—not as a claim that every character reaches these milestones at the same level.
| Priority | Investment | Our Reasoning |
|---|---|---|
| 1 | Relevant damage and necessary survival along your route | Keep ordinary fights manageable while progressing |
| 2 | Blast and Cast and its required connections | Establish the wand-to-staff payoff |
| 3 | Resource support for your chosen spells | Make the payoff repeatable |
| 4 | Wand Evasion Attack | Expand the wand side once the basic loop feels comfortable |
| 5 | Aerial Wand Attack | Add another option if it fits your positioning habits |
| Later | Summon-related branches | Experiment after establishing a dependable baseline |
Do not chase critical chance at any cost. We would rather keep a meaningful defensive or resource benefit than force a slightly more frequent trigger onto a character that struggles to survive.
Likewise, prioritize improvements that support your actual damage split. If most of your useful attacks come from the wand, avoid treating every staff-only bonus as an automatic upgrade.
What to Leave Out Initially
Keep Advanced Necromancy and Totem Mastery outside the first version of this build. That is a focus decision, not a claim that summons are weak.
A lean setup is easier to diagnose. Once it works, you can compare a summon variant against a clear baseline instead of wondering which of three unfinished ideas is holding you back.
Recommended Gear: A Concrete Armor Starting Point
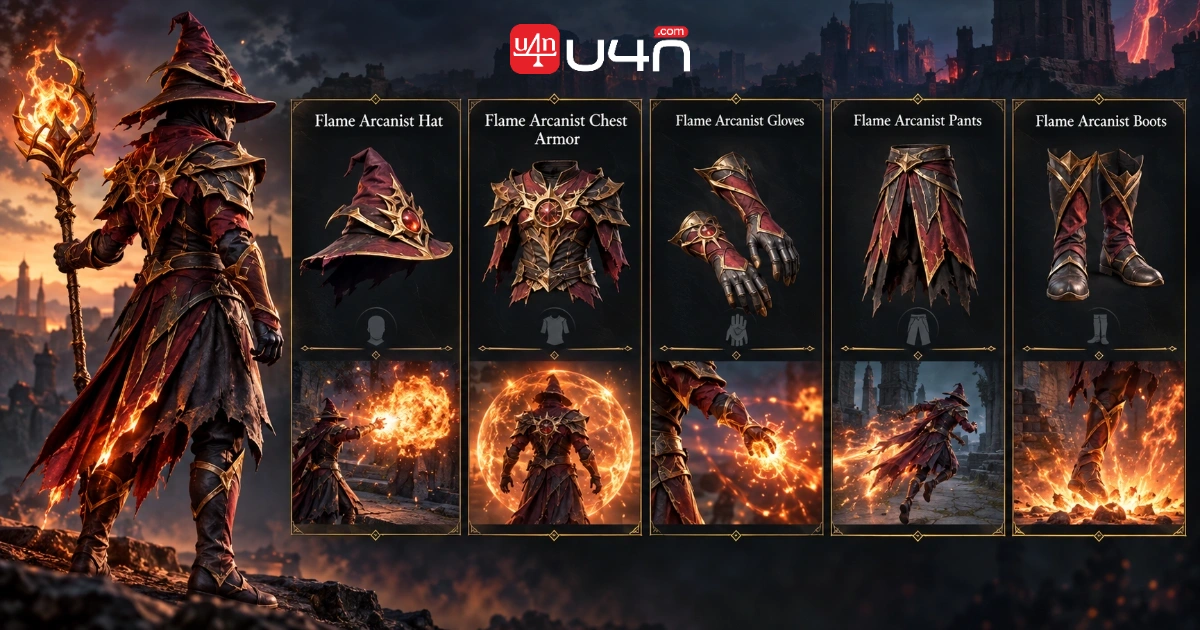
Flame Arcanist is our recommended craftable late-game baseline, not an unqualified best-in-slot declaration. Its listed pieces cover magical critical chance, health, mana, staff damage, and recovery. The set is crafted at the Alchemist, with recipes listed at Flame level 9. Elder pieces provide a loot-based alternative with a similar mage-oriented spread.
The table below explains which pieces we would prioritize and why. Listed bonuses identify the equipment’s role; compare the actual item and upgrade state in your inventory. The official 1.0 progression caps are player level 50 and fully upgraded equipment level 55, so neither a set name nor reaching maximum character level settles every equipment comparison.
| Slot | Recommended Target | Why We Would Use It | Alternative |
|---|---|---|---|
| Head | Flame Arcanist Hat | Magical critical chance supports the core interaction | Elder Hat |
| Chest | Flame Arcanist Chest | Health and mana provide a balanced foundation | Elder Chest or a stronger defensive piece |
| Arms | Flame Arcanist Gloves | Staff damage suits a burst-heavy version | Elder Gloves; compare against wand-focused alternatives |
| Legs | Flame Arcanist Pants | Mana and recovery support repeated encounters | Elder Trousers |
| Feet | Flame Arcanist Boots | Recovery-focused finishing piece | Keep a current-tier defensive option until available |
Which Pieces Should You Make First?
Our default order is chest, recovery pieces, then damage-focused pieces. Change that order when your character clearly needs something else.
If survival and mana already feel comfortable, the hat becomes a more attractive early target. If one interrupted cast regularly ends the fight, start with protection instead.
The gloves deserve particular attention: a staff-focused piece is not automatically the best choice for a character that rarely casts. Either make the staff contribute or reconsider that slot.
How to Choose Your Weapons
Compare wands and staves at similar upgrade states. Then ask:
- Does this weapon improve attacks you actually use?
- Do its perks support your chosen spells or damage type?
- Does it solve a problem against the enemies you are facing?
- Is the upgrade affordable without neglecting the other weapon?
We recommend keeping a second elemental option available rather than forcing one weapon into every encounter. For rings, use one slot to address your clearest weakness before dedicating both to damage.
Spell Loadout and a Practical Combat Loop
Start with a small toolkit. Too many options can turn a straightforward opening into a hotbar search.
Our suggested loadout is:
- One direct-damage spell for a single target.
- Blizzard or Ball Lightning for group encounters.
- Entangle when control fits the encounter.
- Mana Drain as a recovery option.
Choose the direct-damage spell by its current tier, cost, and how reliably you can land it—not nostalgia for an older version of the game.
Against Groups: Create the Opportunity
Picture a room with two melee enemies near the entrance and another threat behind them.
Open from the doorway rather than walking into the middle. Use wand attacks while drawing the front enemies toward a position you can leave safely. If they line up, consider a heavy attack; if a useful critical-hit opportunity appears, assess whether a staff cast will catch enough targets to justify the commitment.
Then reset your position.
The important part is not the exact sequence. It is avoiding a cast that solves the front of the room while leaving you trapped by the back of it.
Against Bosses: Let the Opening Decide
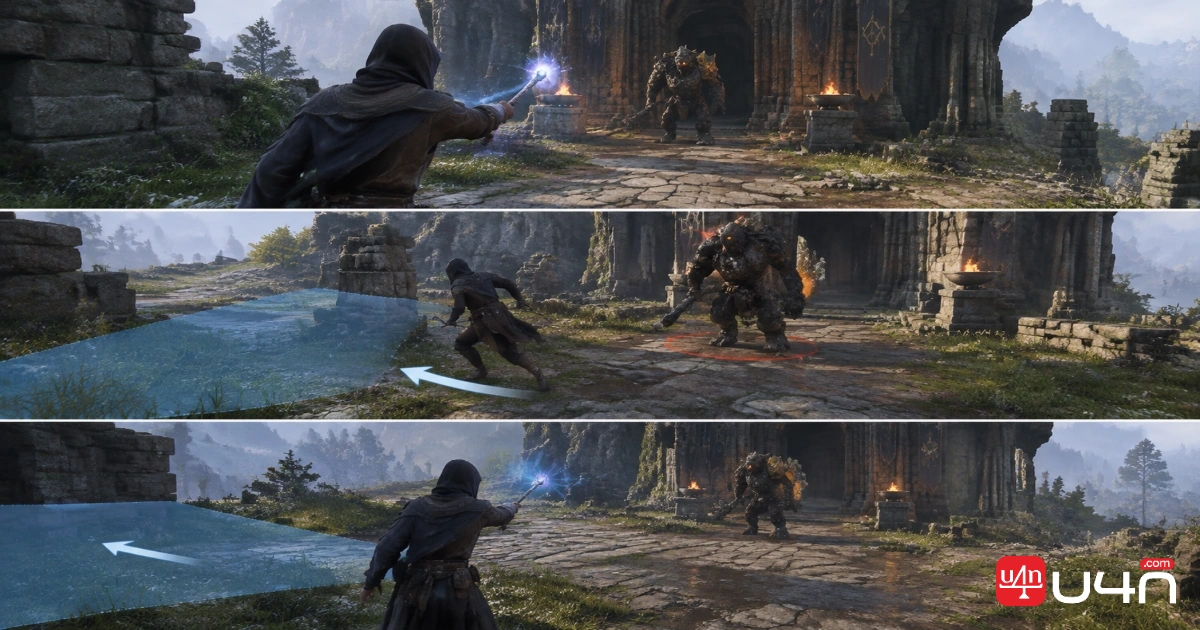
Begin by identifying an attack you can avoid consistently and the recovery window that follows it.
Use wand pressure when you need flexibility. When the boss gives you space, switch to the staff and take the opening. If Blast and Cast lines up, great. If it does not, a clean hit can still be worth taking.
Do not extend a safe opening into an unsafe one just to finish a preferred combo.
A useful decision order is:
- 1. Can I finish this attack without taking an avoidable hit?
- 2. Is the target likely to remain in range?
- 3. Is this spell worth its resource cost here?
- 4. Does the damage bonus improve an already sensible decision?
Putting the bonus last keeps it from dictating bad play.
When Mana Runs Low
Stop treating every enemy as a staff target. Reposition, lean on the wand where appropriate, and use your recovery option when the encounter allows it.
Also review the casts that accomplished little. A missed spell, unnecessary overkill, and an expensive attack against a nearly defeated enemy all deserve attention before you rebuild your equipment around more mana.
Progression: From Starter Loadout to Endgame
Build around milestones rather than a fixed level promise. Exploration, available equipment, and personal comfort can leave two characters at the same level with very different needs.
Early Game: Make One Weapon Dependable
Start with the equipment you can maintain and upgrade. Carry a staff when you have a useful spell for it, but do not divide resources evenly just to make the inventory look complete.
The first milestone is simple: finish routine encounters without spending all your recovery supplies.
Midgame: Commit When Both Weapons Contribute
Move toward the full hybrid when:
- Your wand handles ordinary pressure comfortably.
- Your staff provides a noticeable payoff.
- You can reach the core interaction without dismantling survival.
- Your spell selection covers a real need rather than duplicating options.
If the staff still feels ornamental, upgrade it or simplify the build temporarily. An unfinished hybrid is not automatically better than a focused character.
Endgame: Maintain Two Loadouts
Keep an exploration setup and a boss setup.
For exploration, emphasize recovery and a useful group-damage option. For bosses, select the spell you can land consistently during that encounter's openings, then adjust consumables around survival and resources.
Our food approach follows the same logic: secure a useful offensive benefit, preserve enough health for mistakes, and use the remaining flexibility to address resources or movement. Avoid stacking damage simply because each individual choice looks efficient.
Troubleshooting: Fix the Failure, Not the Fantasy
Before changing equipment, describe what actually went wrong.
| What Happened? | Check First | Recommended Response |
|---|---|---|
| The staff barely mattered | Spell tier, upgrades, missed opportunities | Make switching worthwhile before adding more hybrid investment |
| Mana ran out immediately | Misses, overkill, unnecessary casts | Improve spending before chasing a larger pool |
| You died during a cast | Position and attack commitment | Choose a safer opening or a less demanding attack |
| Damage collapsed against one encounter | Weapon and spell suitability | Try the prepared alternative instead of forcing the same loadout |
| Switching felt clumsy | Hotbar layout | Place wand and staff together; keep recovery easy to reach |
| New gear felt worse | What you gave up | Compare the whole loadout, not the new item alone |
A simple comparison method helps: use a familiar encounter, keep your preparation consistent, and change one major variable at a time.
We care more about repeatable clears, fewer emergency recoveries, and clean execution than a single unusually large hit. That is the difference between a build that looks promising and one you can trust.
FAQ
Is This the Highest-DPS Build in Enshrouded 1.0?
We are not presenting it as a verified all-class damage winner. It is our solo-focused recommendation for balancing flexible pressure, deliberate burst, and practical progression.
Can Beginners Use It?
Yes, as a gradual learning plan. Start with wand fundamentals and one useful staff spell. Add more utility only when switching and positioning stop demanding your full attention.
Should Every Wand Critical Trigger a Staff Attack?
Not in our recommended approach. Take the staff opportunity when it is safe and useful. Losing a bonus is preferable to losing the attempt.
Do You Need a Complete Armor Set?
We would start with functional pieces and improve the weakest slot. The named armor targets provide direction, not a requirement to postpone playing until every piece matches.
If you are comparing Enshrouded Items for sale while planning upgrades, apply the same filter you would to a drop: useful perks, an appropriate upgrade state, and a clear job in the loadout. A recognizable name is not enough reason to replace equipment that already works.
Our verdict: the wand-and-staff Battlemage is a strong solo direction because it rewards judgment, not just inventory quality. Establish the core, give both weapons a purpose, and let actual encounters guide your upgrades. Build for consistent clears first; chase the perfect damage setup afterward.