Cart

Cart Empty

Continue Shopping
Total $0.00
Checkout
Home / Blog / AION 2

Aion 2 Sanctuary Eternal Ludra Guide & Rewards

Written by:  U4N
Published: Apr 24, 2026
45

The Sanctuary Eternal Ludra, also known as the Abyssal Forge, is a high-level 8-player raid in Aion 2. This raid is renowned for its challenging bosses and high-tier loot, such as extendable weapons and hero-grade accessories. Players must work together, use precise mechanics, and remain in sync to overcome the raid's tough encounters.

Aion 2 Sanctuary Eternal Ludra Guide

Boss 1: Fusion Reactor / Devouring Klawfly

Loot: Sanctuary boxes containing gold and orange bracelets
Mechanics: The first boss fight in the raid focuses on HP-based phasing, which means the boss's difficulty ramps up as its HP decreases. Players need to handle line AoE attacks and tether debuffs that deal heavy damage if not avoided. Coordination is key to surviving this phase, as missing any of these mechanics can lead to significant damage to the entire party.

Boss 2: Ketu (Abyssal Wings)

This boss is known for its punishing mechanics, earning the nickname "Laser Hide 'n Seek Hell." Players must avoid stamina-draining attacks and one-shot mechanics by executing the following strategies.

Mechanics:

  • Mark Jump Rope: Keep an eye on Ketu's "red eyes" and time your jumps accordingly to prevent stacking damage.
  • Hide & Seek (75% HP): At this phase, Ketu becomes "innocent," and players must gather at the 6 o'clock position. Split into two groups to climb ropes, kill adds, and dodge lasers.
  • Gaze Beads (50% HP): Players need to memorize and follow the Red and Blue gaze sequence (e.g., Red-Turn-Blue-Red) to avoid being hit by the boss's gaze mechanic.
  • Soul Stone Phase (25% HP): When red fan plates appear on the floor, stack near the boss and hit the Soul Stones to activate a 5-second i-frame, preventing a wipe.

Rewards: Defeating Ketu grants players one Sanctuary Box (or Abyssal Box), with a chance for gold and orange (Heroic) bracelets to drop.

Final Boss: Eternal Ludra

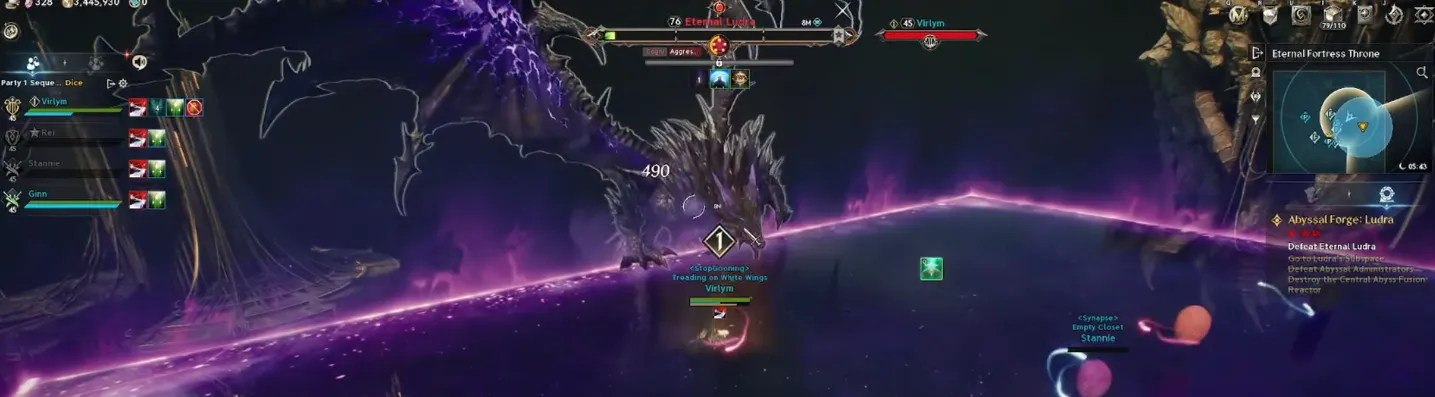
The final encounter in the Sanctuary Eternal Ludra raid is highly mechanical, with multiple phases requiring sharp execution and the right team composition.

Phase 1: Players will encounter standard raid mechanics, including line AoEs and orb towers that need to be managed carefully. This phase tests players' ability to handle consistent damage while positioning correctly.

Phase 2 (Color Mix):
A new mechanic is introduced, where players will receive either a red or blue debuff.

  • Blue players move to the right side of the room.
  • Red players move to the left side.
    Players will need to avoid the color-based hazards by positioning themselves correctly.

Color Circles: Healers should step into the initial circles corresponding to their color. Other players must jump into them at the last second to help ensure the raid survives the transition.

Healing Checks: This phase includes heavy healing checks. Healers are crucial here—while DPS players can bypass some mechanics, healers (especially Clerics or Chanters) need to ensure that the team remains alive. Chanters can substitute for Clerics if they use defensive skills like Shield Stigma and Recoup to pass the healing checks.

Rewards

Winning the Sanctuary Eternal Ludra raid offers high-value progression materials and powerful end-game gear. Here's what you can expect:

  • Extendable Weapons: Ludra is a primary source of extendable weapons, which provide strategic advantages in both melee and ranged combat. These weapons are highly sought after for their ability to adjust in length, adding extra reach and versatility.
  • Tuning Stones: Players will earn Tuning Stones (Unique) (Engraved) from Ludra, which are used for upgrading and strengthening equipment.
  • Abyss Equipment Series: Players will also receive Abyss Equipment, which is guaranteed from the raid's final boss.
  • Equipment Change Tickets: These tickets allow you to modify your equipment further by combining them with Ludra weapons or armor and Kinah at the NPC [Material Conversion - Equipment].
  • Sync Stones: New post-patch rewards include Sync Stones, which can be used for further enhancement.

Key Equipment Highlights

  • Ludra's Fatal Bow: One of the high-grade weapons available from the raid.
  • Ludra's Bracelet: A Heroic-grade accessory that can be sold for up to 149,300 gold.

As you conquer the final boss, Eternal Ludra, in the Sanctuary Eternal Ludra raid, you'll be rewarded with some of the most coveted items in Aion 2, including extendable weapons, Tuning Stones, Abyss Equipment, and Equipment Change Tickets. These items are essential for progressing your character to the highest levels. If you're looking to enhance your gear even further, you can use Kinah at the [Material Conversion - Equipment] NPC to modify your items. If you're short on Aion 2 Kinah, you can always turn to trusted sources like U4N, where you can find Aion 2 Kinah for Sale to help speed up your progression and ensure you're fully prepared for the toughest challenges the game has to offer.

Strategies & Tips

To master the Sanctuary Eternal Ludra raid, your group should focus on coordination for these advanced mechanics:

General Coordination

  • The "Bingo" Pattern (50% & 25% HP): Assign each of the 8 players to a specific zone on the grid. Fill the outer four tiles first, then complete the final inner tile together to prevent accidental wipes.
  • Healer Priority: Never assign mechanic-handling (like orb towers or "Bingo" tiles) to your healers. Their only job is to stay alive and keep the raid topped off; if they die, it’s usually a wipe.
  • Towel Toss (Boss 1): A random player gets a "towel" debuff that ticks down. Pass it to a nearby ally before the timer hits zero or you die. If the towel holder dies, a black hole spawns; three black holes will wipe the entire force.

Positioning & Movement

  • Ranged Spread: Ranged DPS must stay spread out. Their ground AoEs (poison puddles) last roughly 30 seconds and can overlap, quickly becoming lethal.
  • Stamina Management: Use stamina potions for the "Hide & Seek" climbing phases on Boss 2 to ensure you don't run out while avoiding the one-shot lasers.
  • The Three Slash Pattern: Count the boss's melee swings—"one, two, three." The third hit is a massive frontal cleave; tanks must face the boss away, and everyone else must stay behind or at the sides.

Critical Phase Strategies

  • Soul Stone I-Frames (Boss 2, 25% HP): When the boss prepares his ultimate wipe, hit the nearby Soul Stones to gain a 5-second invincibility (i-frame). Do not hit the stones designated for your healers; they need them to survive and revive anyone who missed their timing.
  • Gaze Beads Sequence: Memorize the Red/Blue orb pattern. Red means look at the boss; Blue means look away. The most common survival sequence is Red -> Turn Away -> Blue -> Red.
PREVIOUS Next
About the Author

The U4N Editorial Team is made up of dedicated gamers and technical experts. We're not just a trusted marketplace for game assets—we're all about empowering players with top-tier, expert-driven content. Our team produces in-depth guides, strategies, and technical fixes for some of the biggest games out there, like MLB The Show 26, Aion 2, Forza Horizon 6, Arc Raiders, and Path of Exile.

Whether it's mastering market flipping in Diamond Dynasty or optimizing your endgame builds, all of our strategies are tested and proven by in-house experts. At U4N, we don't just follow the meta—we help you stay ahead of it.

Related Articles