Cart Empty
Continue ShoppingThe Agitator is one of the most dangerous leadership units associated with the Cyborg Legion on Cyberstan in Helldivers 2. Standing roughly 7 to 8 feet tall and protected by heavy bionic armor, this command unit can dramatically increase the threat level of nearby Automatons.
Unlike standard enemies that simply attack Helldivers, the Agitator functions as a battlefield force multiplier. It commands nearby Troopers, Devastators, and Berserkers, improving their combat performance while staying behind cover and attacking from range. Because of this, identifying and eliminating the Agitator should be a top priority whenever one appears in an Automaton encounter.
The Agitator’s biggest strength is not its own damage output. Its real threat comes from the ability to enhance the Automaton forces around it.
When an Agitator detects a Helldiver, nearby units under its command receive a powerful combat boost. Their eyes change from the normal red glow to a bright orange-yellow, making the affected enemies easy to recognize during a chaotic fight.
The enhancement improves several aspects of their combat behavior, including:
· Increased movement speed
· Greater accuracy
· Faster and more aggressive fire rates
· More coordinated pressure against Helldivers
A group of ordinary Automatons can therefore become considerably more dangerous when an Agitator is present.
| Attribute | Details |
|---|---|
| Faction | Cyborg Legion |
| Location | Cyberstan |
| Approximate Height | 7–8 feet |
| Primary Role | Automaton command/support unit |
| Main Buff Targets | Troopers, Devastators, Berserkers |
| Main Weapon | Hydrogen/Plasma Charger Cannon |
| Secondary Attack | High-explosive grenades |
| Armor | Heavy ablative plating |
| Key Weakness | Chest armor/core and exposed head |
| Special Death Effect | System Shock |
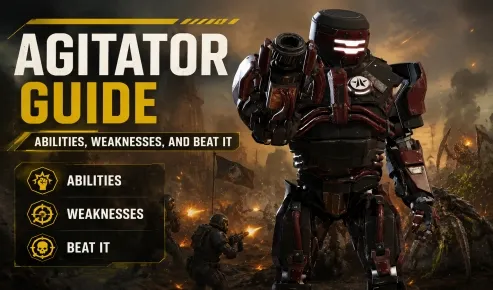
Automaton Command is the Agitator’s defining ability. Once it identifies a Helldiver, it takes control of nearby Automaton units and enhances their performance.
The buffed enemies can move more quickly, shoot more accurately, and attack more aggressively. The visual change in their eyes provides a useful warning that an Agitator is actively influencing the battlefield.
This makes the Agitator particularly dangerous in groups containing several Devastators or Berserkers. The longer the commander survives, the more pressure its squad can place on the Helldivers.
The Agitator is also capable of dealing significant ranged damage itself.
It generally prefers to maintain distance and use cover rather than charging directly into combat. Its arm-mounted Hydrogen/Plasma Charger Cannon can fire standard ballistic projectiles, but it can also charge the weapon and release explosive plasma bursts.
The charged shots are especially dangerous because they can punish players who remain exposed for too long.
The Agitator can throw high-explosive grenades to force Helldivers away from cover or punish predictable defensive positions.
This creates an important tactical problem: hiding behind cover does not necessarily make you safe. Players may need to reposition frequently while maintaining enough pressure to prevent the Agitator from supporting its surrounding units.
When fighting an Agitator and its followers, visual awareness is critical.
| Visual/Combat Sign | What It Means |
|---|---|
| Orange-yellow glowing eyes | Automaton is being enhanced by an Agitator |
| Faster enemy movement | Agitator buff is active |
| Increased firing speed | Buffed combat behavior |
| More accurate attacks | Agitator is improving nearby units |
| Agitator staying behind cover | Command unit is attempting to maintain battlefield control |
| Multiple aggressive bots converging | Commanded units are applying coordinated pressure |
Once you see the orange-yellow glow, avoid treating the enemies as ordinary Automatons. The most efficient response is usually to locate and eliminate the Agitator rather than attempting to clear the entire group first.
The best counter to an Agitator is surprisingly simple: remove the commander.
Killing the Agitator activates System Shock, which removes its speed enhancement from nearby units and briefly stuns bots within its command radius. The stun lasts for roughly 3 seconds, creating a valuable opportunity to recover, reload, reposition, or eliminate surviving enemies.
This means the Agitator’s death provides two benefits at once:
1. The enemy squad loses its combat enhancement.
2. Nearby Automatons are temporarily stunned.
In a difficult firefight, those few seconds can completely change the situation.
For players managing limited resources, understanding this priority is also important when deciding whether to invest in Helldivers 2 Items or adjust their loadout for encounters involving heavily armored Automaton commanders.
The Agitator is heavily armored from head to toe and cannot simply be staggered immediately with weaker attacks.
Its outer armor acts as a protective layer, so the first stage of the fight is about breaking through that protection.
The chest plate is one of the most reliable weak points.
Use weapons with medium armor penetration to concentrate fire on the chest. Continue attacking until the armor begins to spark and eventually breaks apart.
Once the chest plate is destroyed, the vulnerable inner core becomes exposed.
At this point, the Agitator becomes much easier to damage, and standard small-arms fire can be used to finish it.
Impact Grenades can also be effective for damaging heavily armored sections such as the chest or helmet.
They are particularly useful when the Agitator is positioned behind difficult cover or when you need to create an opening quickly.
Players using accurate weapons can take a different approach.
Designated Marksman Rifles and similarly precise weapons can target the Agitator’s helmet. According to the provided combat information, a helmet can potentially be removed with two accurate shots, followed by a third headshot to secure the kill.
This strategy rewards controlled aim rather than simply dumping ammunition into the armored body.
| Situation | Recommended Target | Objective |
|---|---|---|
| Agitator fully armored | Chest plate | Break outer armor |
| Chest armor damaged | Exposed core | Rapidly reduce health |
| Using accurate weapons | Helmet/head | Remove helmet and finish with headshots |
| Unable to safely attack the body | Arm cannon | Disable ranged suppression |
| Surrounded by buffed bots | Agitator first | Trigger System Shock |
A direct attack on the Agitator can be dangerous, especially when several buffed Automatons are protecting it.
In these situations, targeting its under-slung arm cannon can be a useful alternative.
Destroying the weapon removes one of the Agitator’s most dangerous ranged options and gives your squad a better opportunity to reposition or flank.
This approach is particularly valuable when the Agitator is controlling a large group and its plasma attacks are preventing you from advancing.
A reliable encounter can be broken down into several stages.
Look for the heavily armored Agitator whenever nearby Automatons suddenly become much faster or more aggressive. The orange-yellow eyes of affected enemies are an important visual clue.
Do not spend too much time eliminating the buffed Troopers, Devastators, or Berserkers while their commander remains alive.
Focus fire on the Agitator and break its defensive armor as quickly as possible.
Use medium-penetration weapons against the chest plate. Keep pressure on the same area rather than scattering shots across its armored body.
Once the chest armor breaks, switch your attention to the exposed inner core. Basic weapons become considerably more effective against the vulnerable area.
With a high-accuracy weapon, target the helmet. Removing it can create another path toward a fast elimination.
Once the Agitator dies, nearby Automatons should lose their enhancement and suffer the temporary System Shock stun.
Use this window to eliminate remaining enemies, reload, recover, or reposition.
Several mistakes can make this enemy much harder than necessary.
Ignoring the commander. Clearing buffed infantry first allows the Agitator to continue enhancing new or surviving units.
Shooting random armor sections. Concentrated fire against the chest is generally more efficient than spreading damage across multiple heavily armored locations.
Standing in the open. The Agitator’s charged plasma attacks and accurate supporting Automatons can quickly punish exposed players.
Forgetting about the cannon. When a direct kill is difficult, disabling the arm-mounted weapon can dramatically reduce incoming pressure.
Missing the System Shock opportunity. The Agitator’s death is not merely a kill; it creates a temporary opening against its entire command group.
The overall strategy can be summarized as follows:
| Priority | Action | Reason |
|---|---|---|
| 1 | Find the Agitator | Identify the source of the enemy buff |
| 2 | Focus the commander | Stop the battlefield enhancement |
| 3 | Break chest armor | Expose the vulnerable core |
| 4 | Target head if practical | Provides another fast-kill route |
| 5 | Disable cannon if necessary | Reduce ranged pressure |
| 6 | Exploit System Shock | Capitalize on the temporary stun |
| 7 | Clean up remaining Automatons | Finish the encounter safely |
An Agitator encounter rewards players who bring weapons capable of dealing with armored targets while maintaining enough accuracy for precision shots.
Medium armor penetration should be a major consideration, while precise weapons can offer an alternative route through the helmet. Explosive options such as Impact Grenades can also provide additional flexibility.
Players who frequently fight Automaton-heavy missions should also consider how their overall equipment and resource management support sustained engagements. Having access to the right Helldivers 2 Items can make it easier to maintain an effective setup for difficult encounters.
The Agitator becomes dangerous when Helldivers allow it to operate freely behind its frontline units. Its ability to enhance Troopers, Devastators, and Berserkers can rapidly turn an ordinary firefight into an overwhelming attack.
The key is to reverse that advantage as quickly as possible. Locate the commander, focus its chest armor or helmet, disable its cannon when necessary, and eliminate it before dealing with the rest of the squad. Once System Shock activates, use the brief stun and removal of the enemy buff to regain control of the battlefield.
The Agitator may be built to command the fight, but with the right target priority and armor-breaking strategy, Helldivers can make the commander the first enemy to fall.
The U4N Editorial Team is made up of dedicated gamers and technical experts. We're not just a trusted marketplace for game assets—we're all about empowering players with top-tier, expert-driven content. Our team produces in-depth guides, strategies, and technical fixes for some of the biggest games out there, like MLB The Show 26, Aion 2, Forza Horizon 6, Arc Raiders, and Path of Exile.
Whether it's mastering market flipping in Diamond Dynasty or optimizing your endgame builds, all of our strategies are tested and proven by in-house experts. At U4N, we don't just follow the meta—we help you stay ahead of it.