


Want to sell game currency, items, or gaming services on U4N? This guide walks you through account registration, seller onboarding, product listing, and bulk management. Every step includes a screenshot, so new sellers can follow along easily.
Choose Your Path
Before You Begin
An active email address and a phone number that can receive text messages.
The game, platform or server, product category, price, and available inventory.
The delivery methods, estimated delivery time, and warranty period you can support.
For custom products, prepare clear, accurate images and a description that match the product.
Fields may vary by game, server, and product type. This guide covers the general process; always follow the current U4N page and the latest downloaded template.
1. Register a U4N Account and Complete Seller Onboarding
If you are already a U4N seller, skip directly to the standardized product, custom product, or bulk management section.
Step 1: Go to the U4N Website
Visit www.u4n.com, then click the account avatar in the upper-right corner of the home page to open the sign-in page.
Completion check:The page displays options to sign in and create an account.
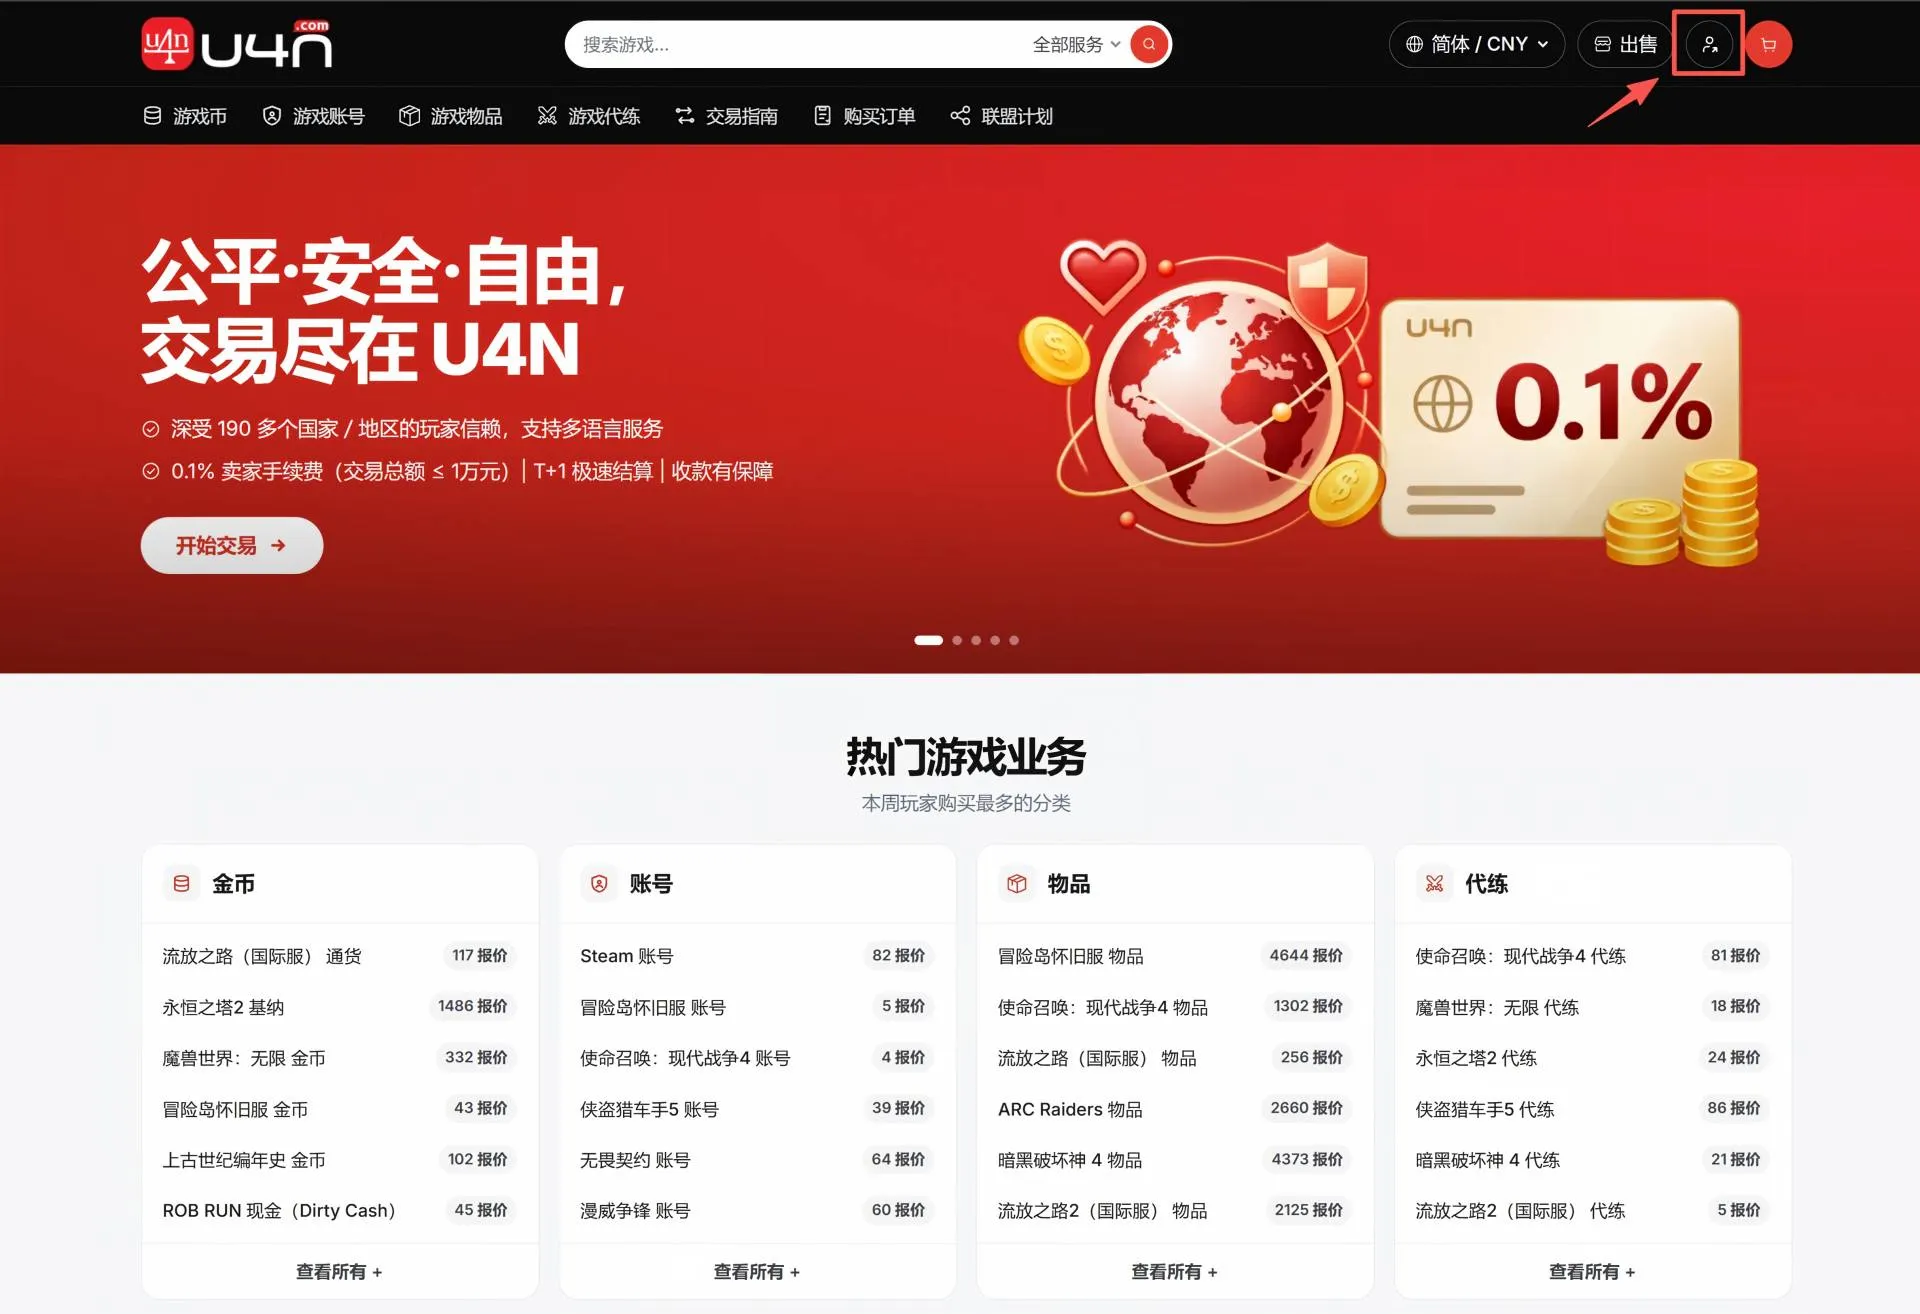
Step 2: Create a U4N Account
If this is your first visit, click “Create Account” to open the registration page. If you already have an account, sign in and skip to Step 6.
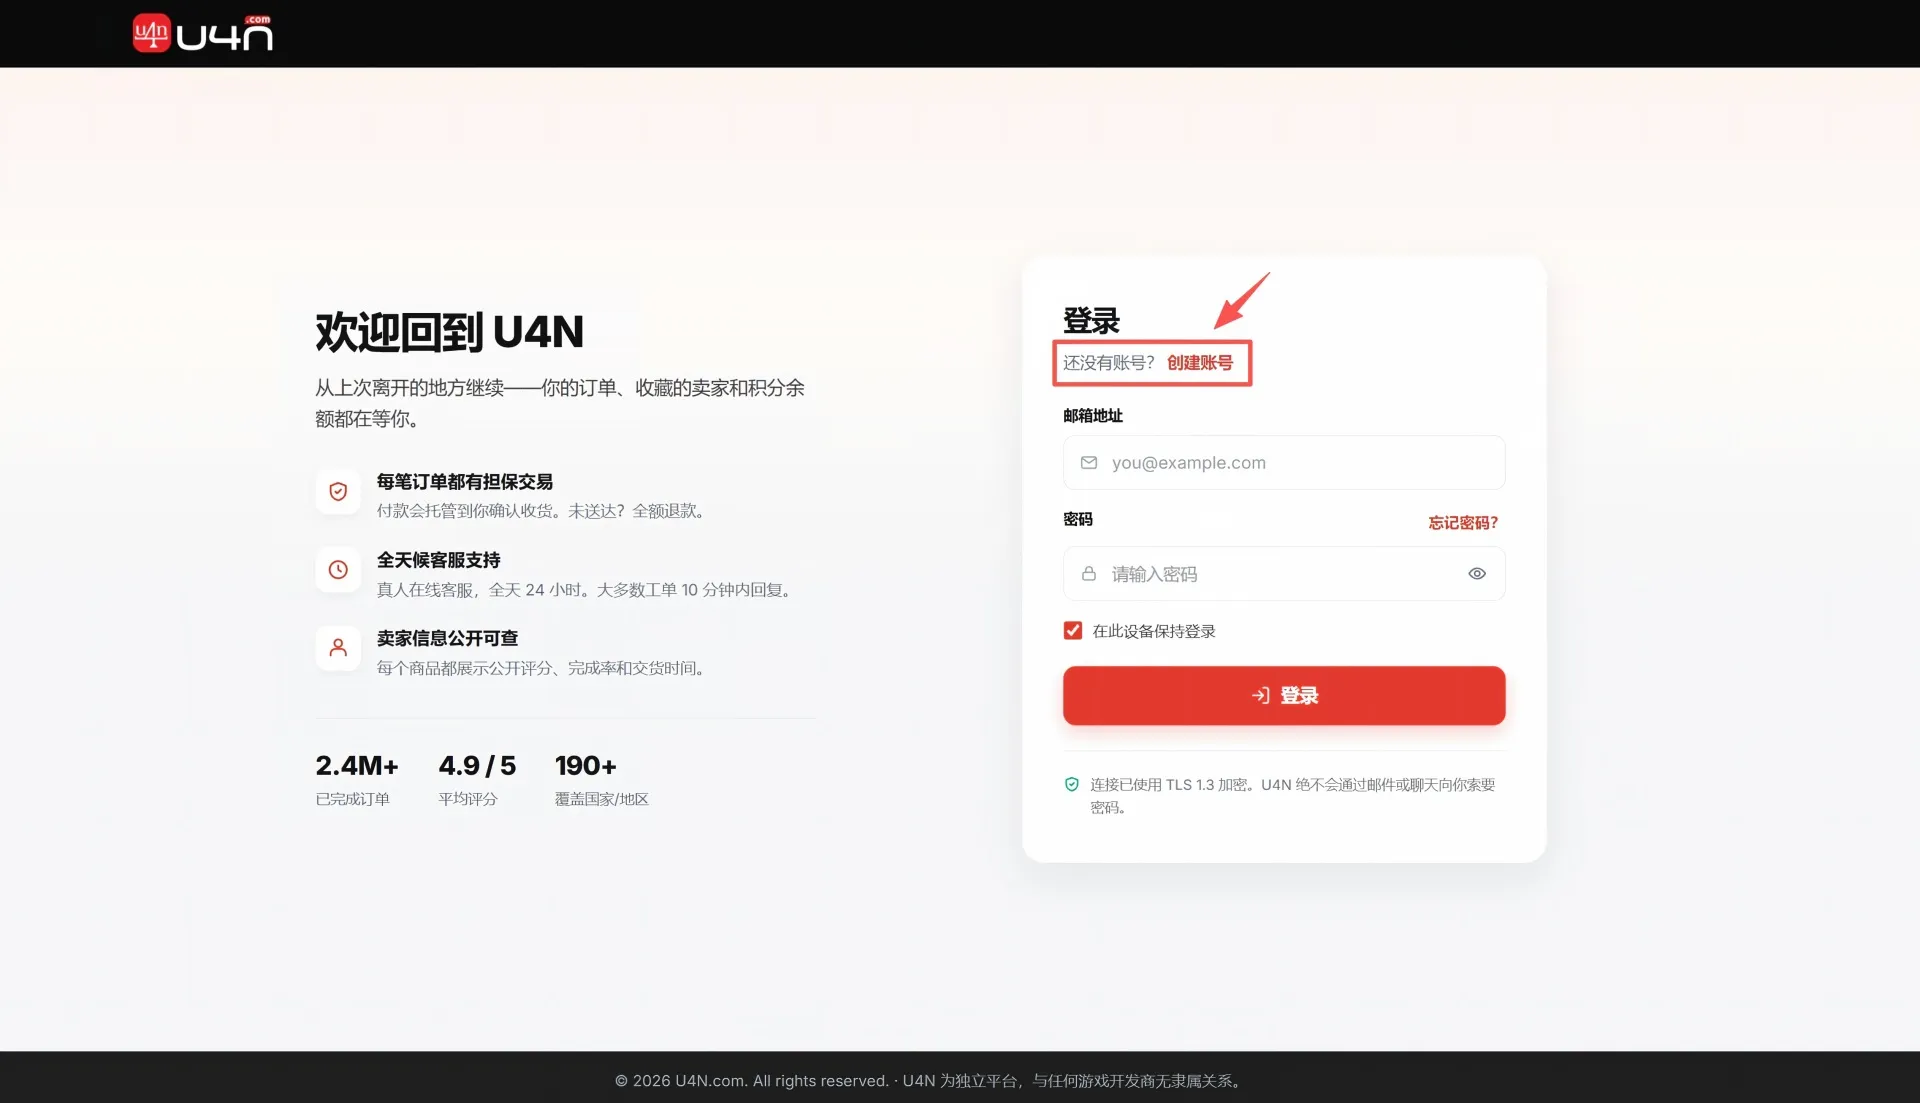
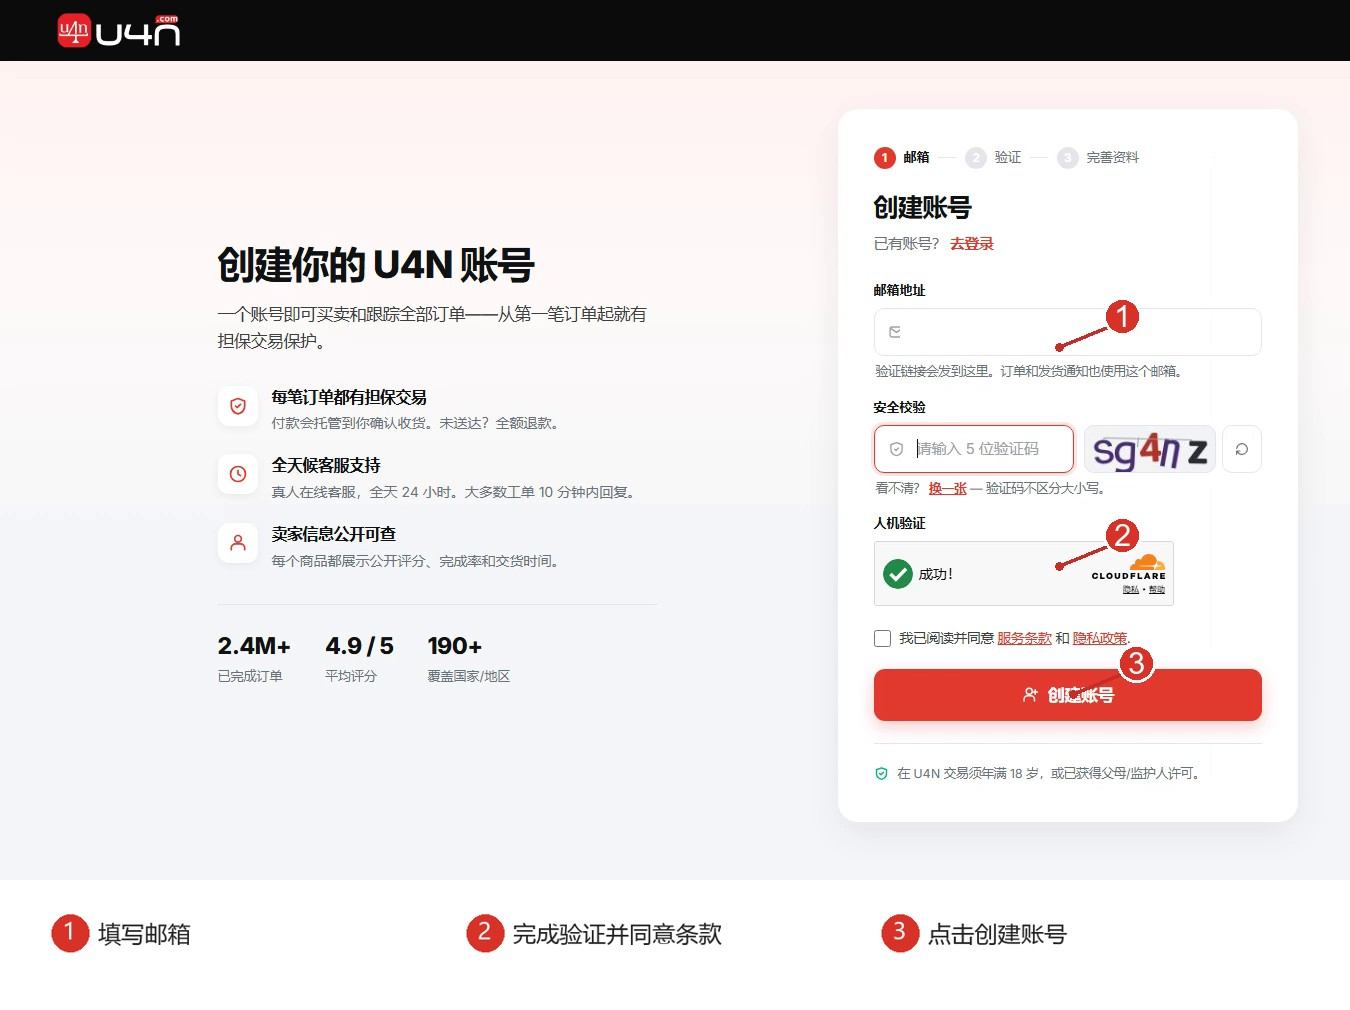
Step 3: Enter Your Email and Submit Your Registration
Enter an email address you use regularly, then complete the security and human verification checks. Read and accept the Terms of Service and Privacy Policy, then click “Create Account”。
Tip:Use a long-term email address. Future sign-in verification messages and important notices will be sent there.
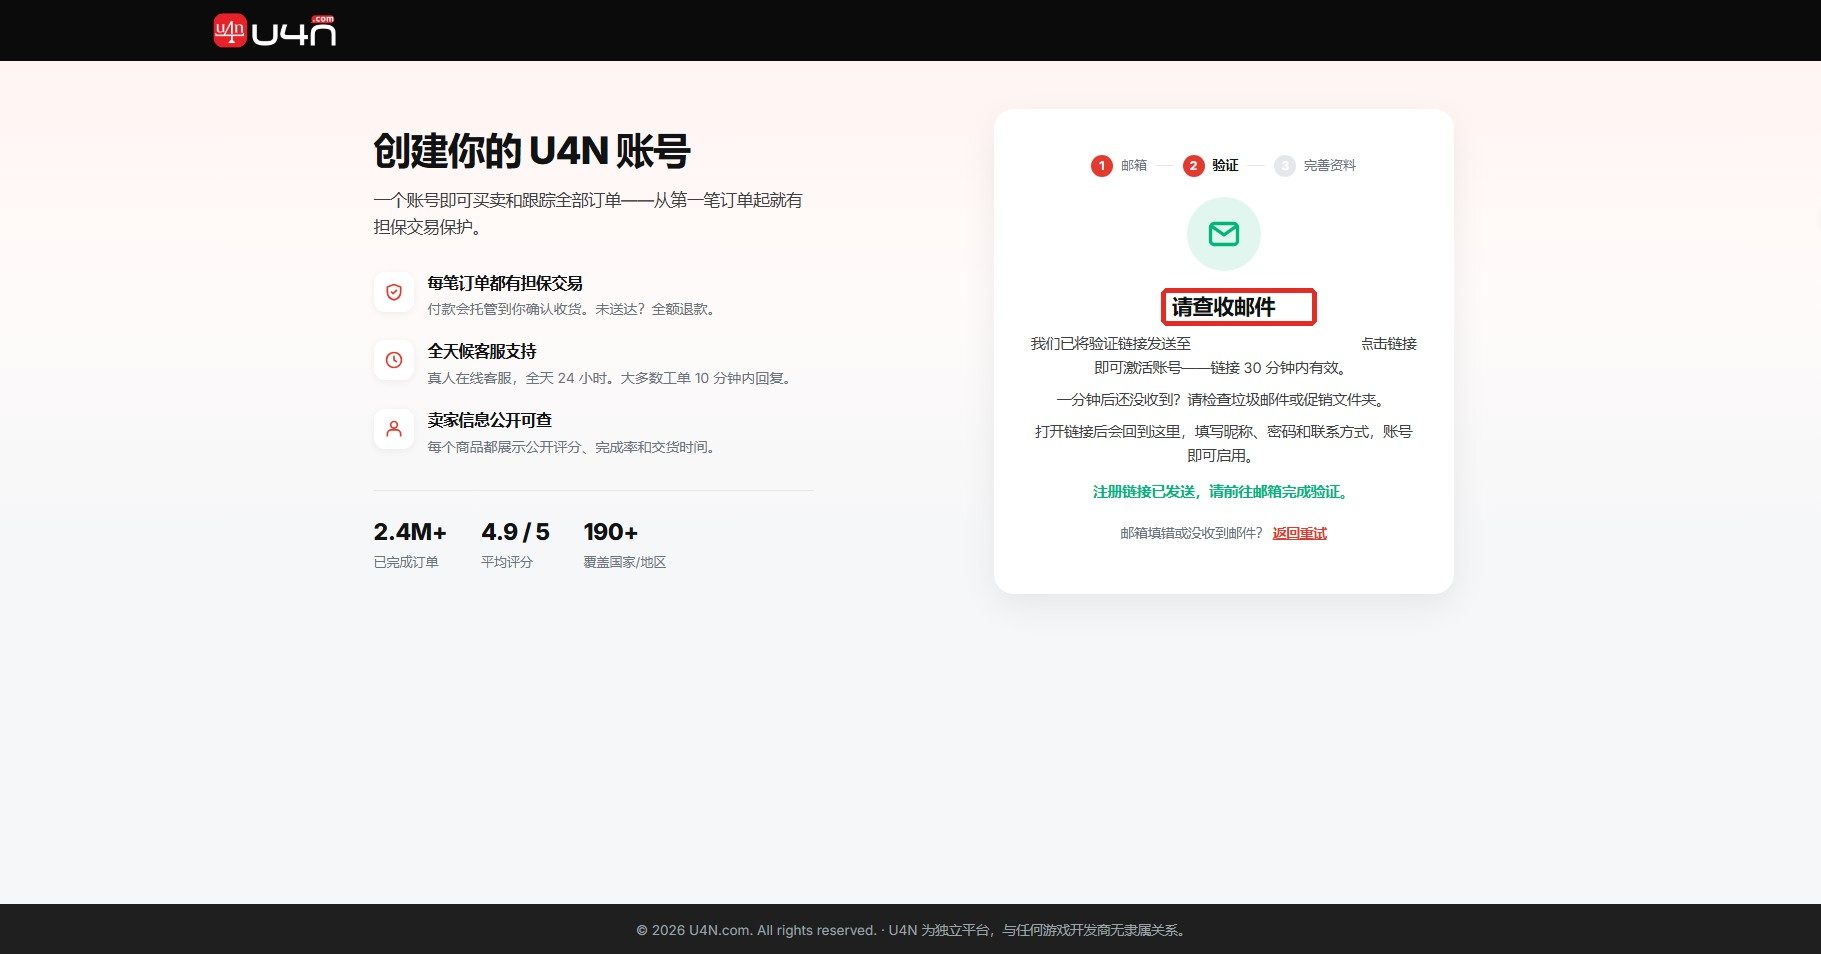
Step 4: Check Your Email and Verify Your Address
Check your inbox for the U4N verification email and open the verification link. The link is valid for 30 minutes, so complete this step promptly.
Did not receive the email?Wait a few moments, then check your spam or promotions folder. If it still does not arrive, return to the registration page and resend it.
Step 5: Complete Your Profile and Sign In
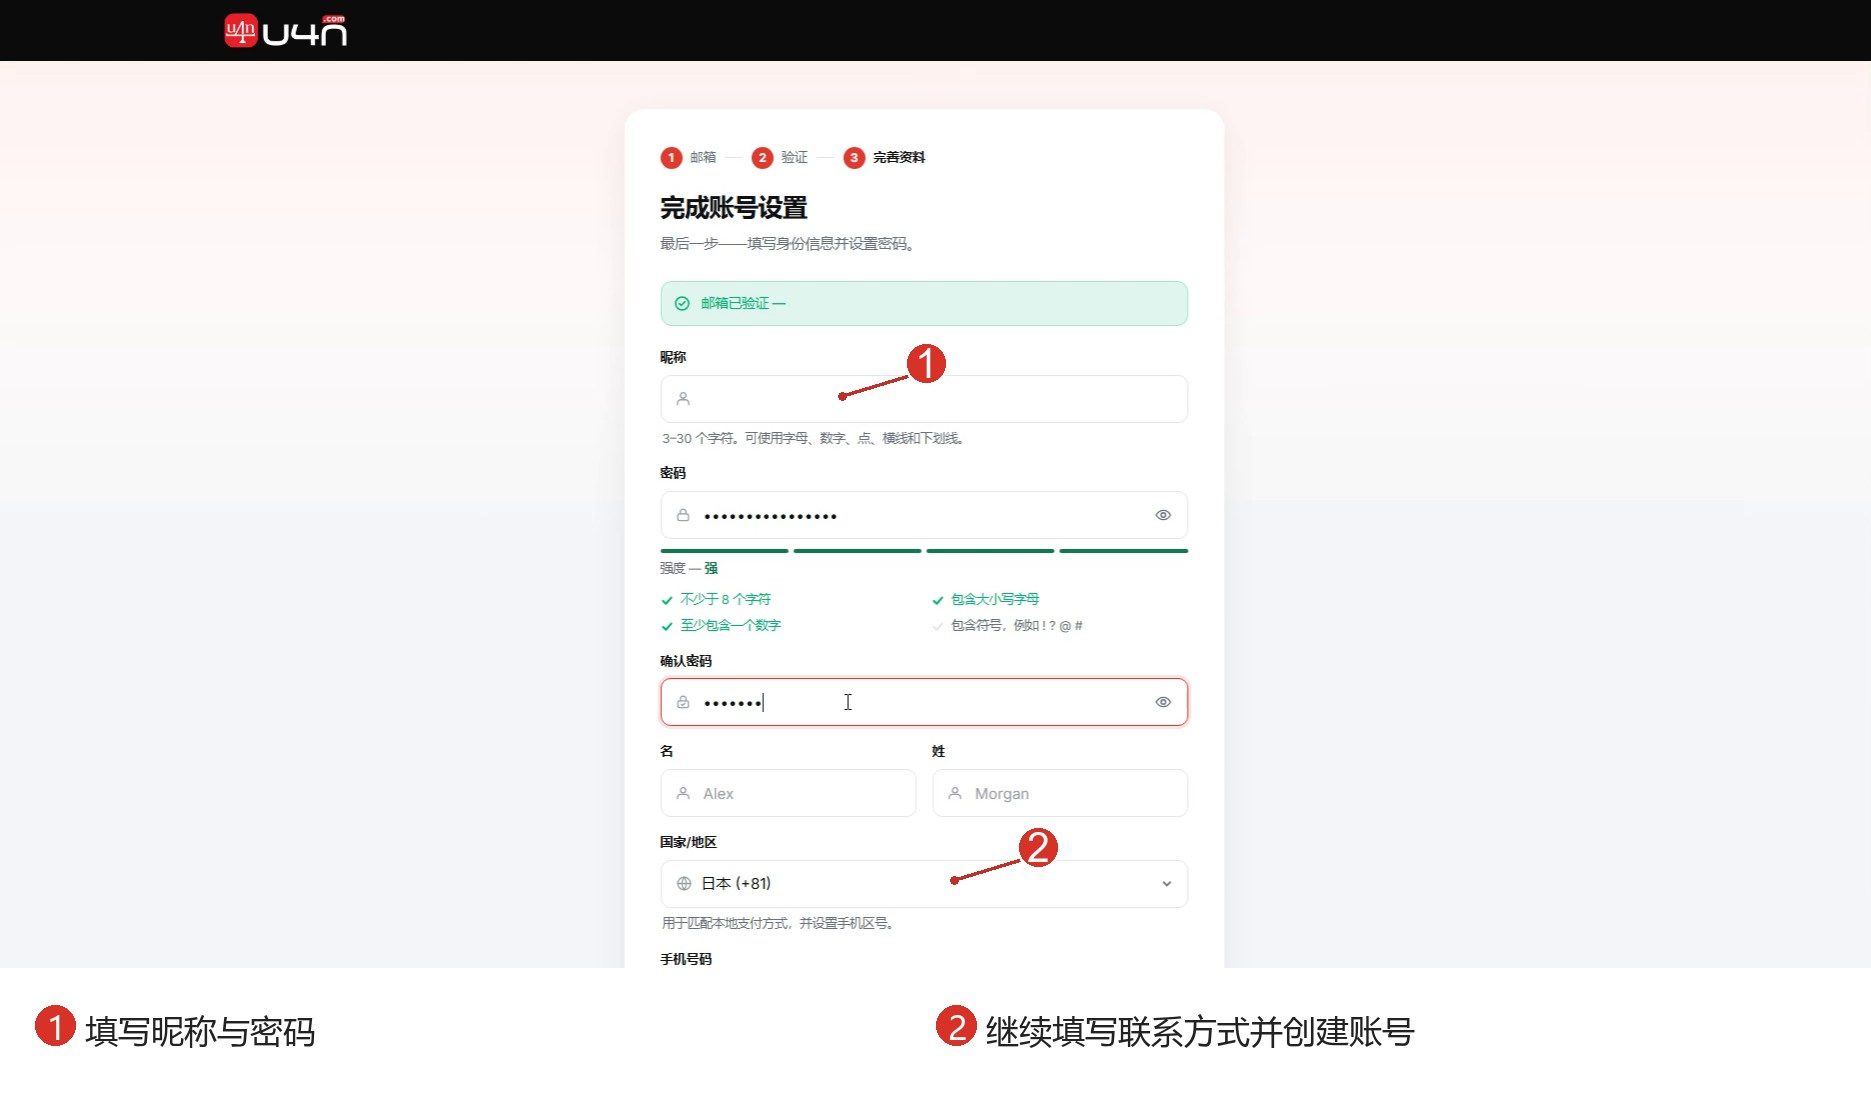
After verification, set a display name and password, then enter your name, country or region, and phone number. Referrer information is optional.
After confirming that your information is correct, click “Create My Account”, then sign in with your registered email and password.
Step 6: Apply to Become a U4N Seller
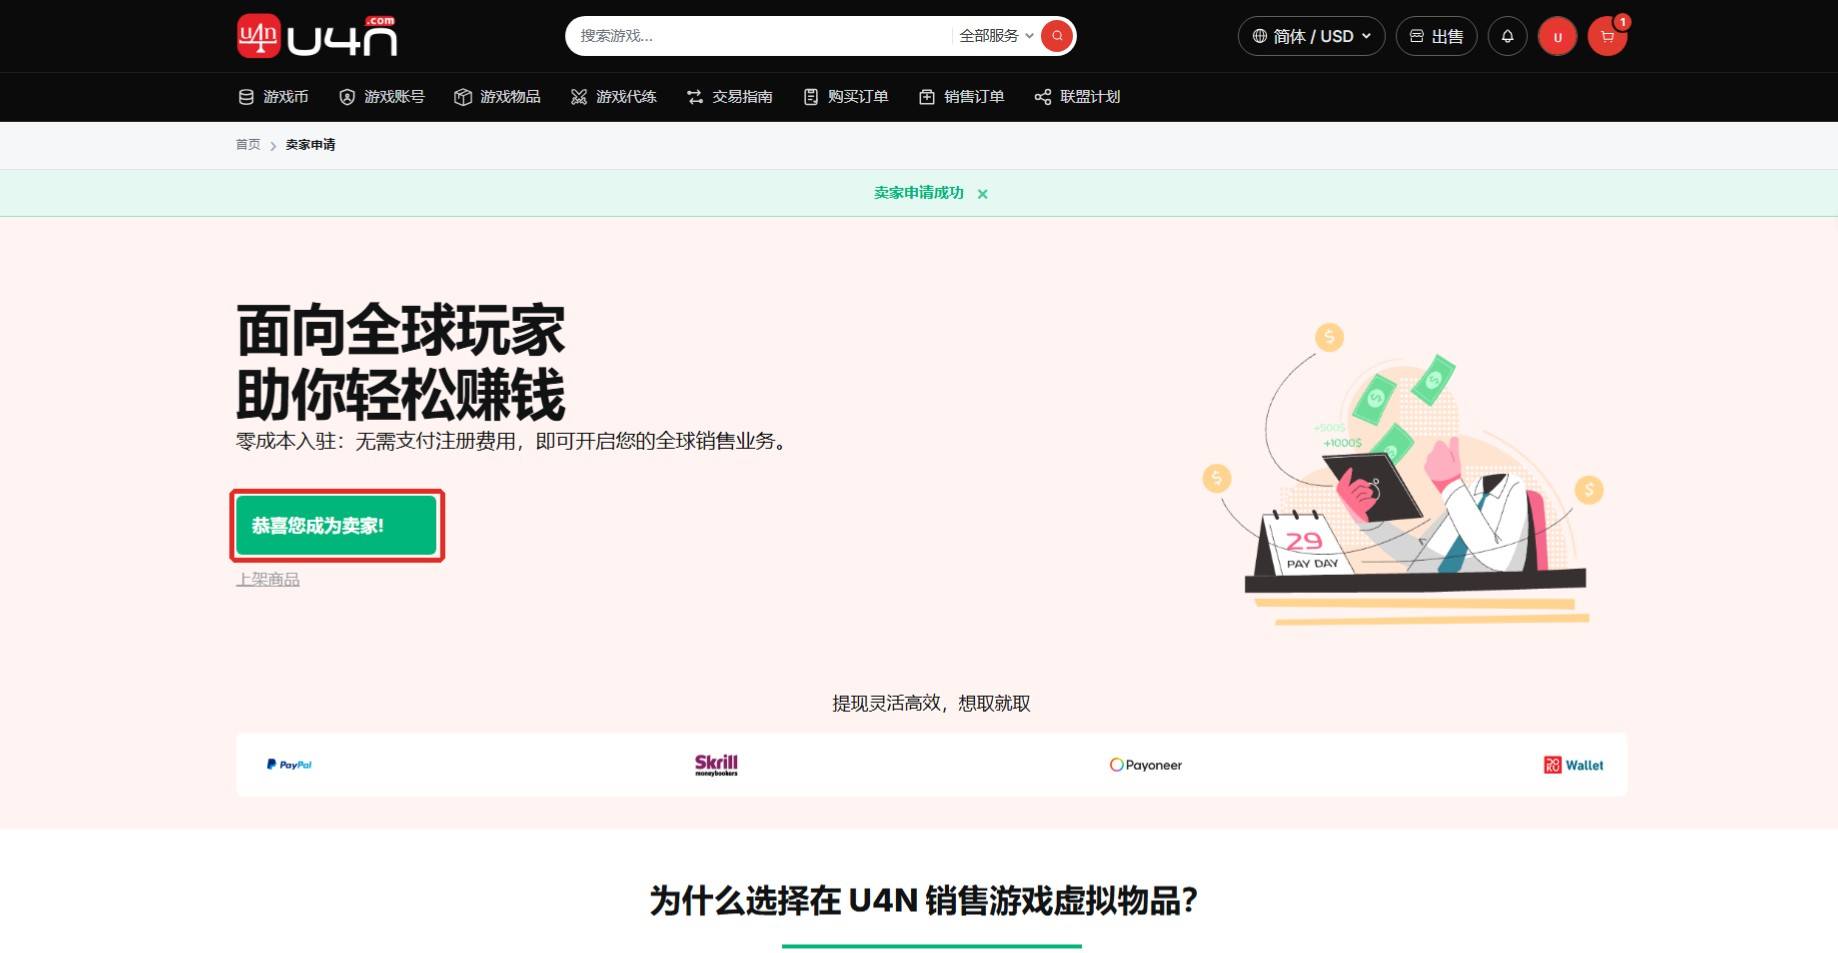
After signing in, click “Sell” at the top of the page to open the seller application, then follow the on-screen instructions to submit it.
Completion check:You see “Seller application successful” or “Congratulations, you are now a seller.” You can then click “List Product” to continue.
Step 7: Get Familiar with the Seller Menu
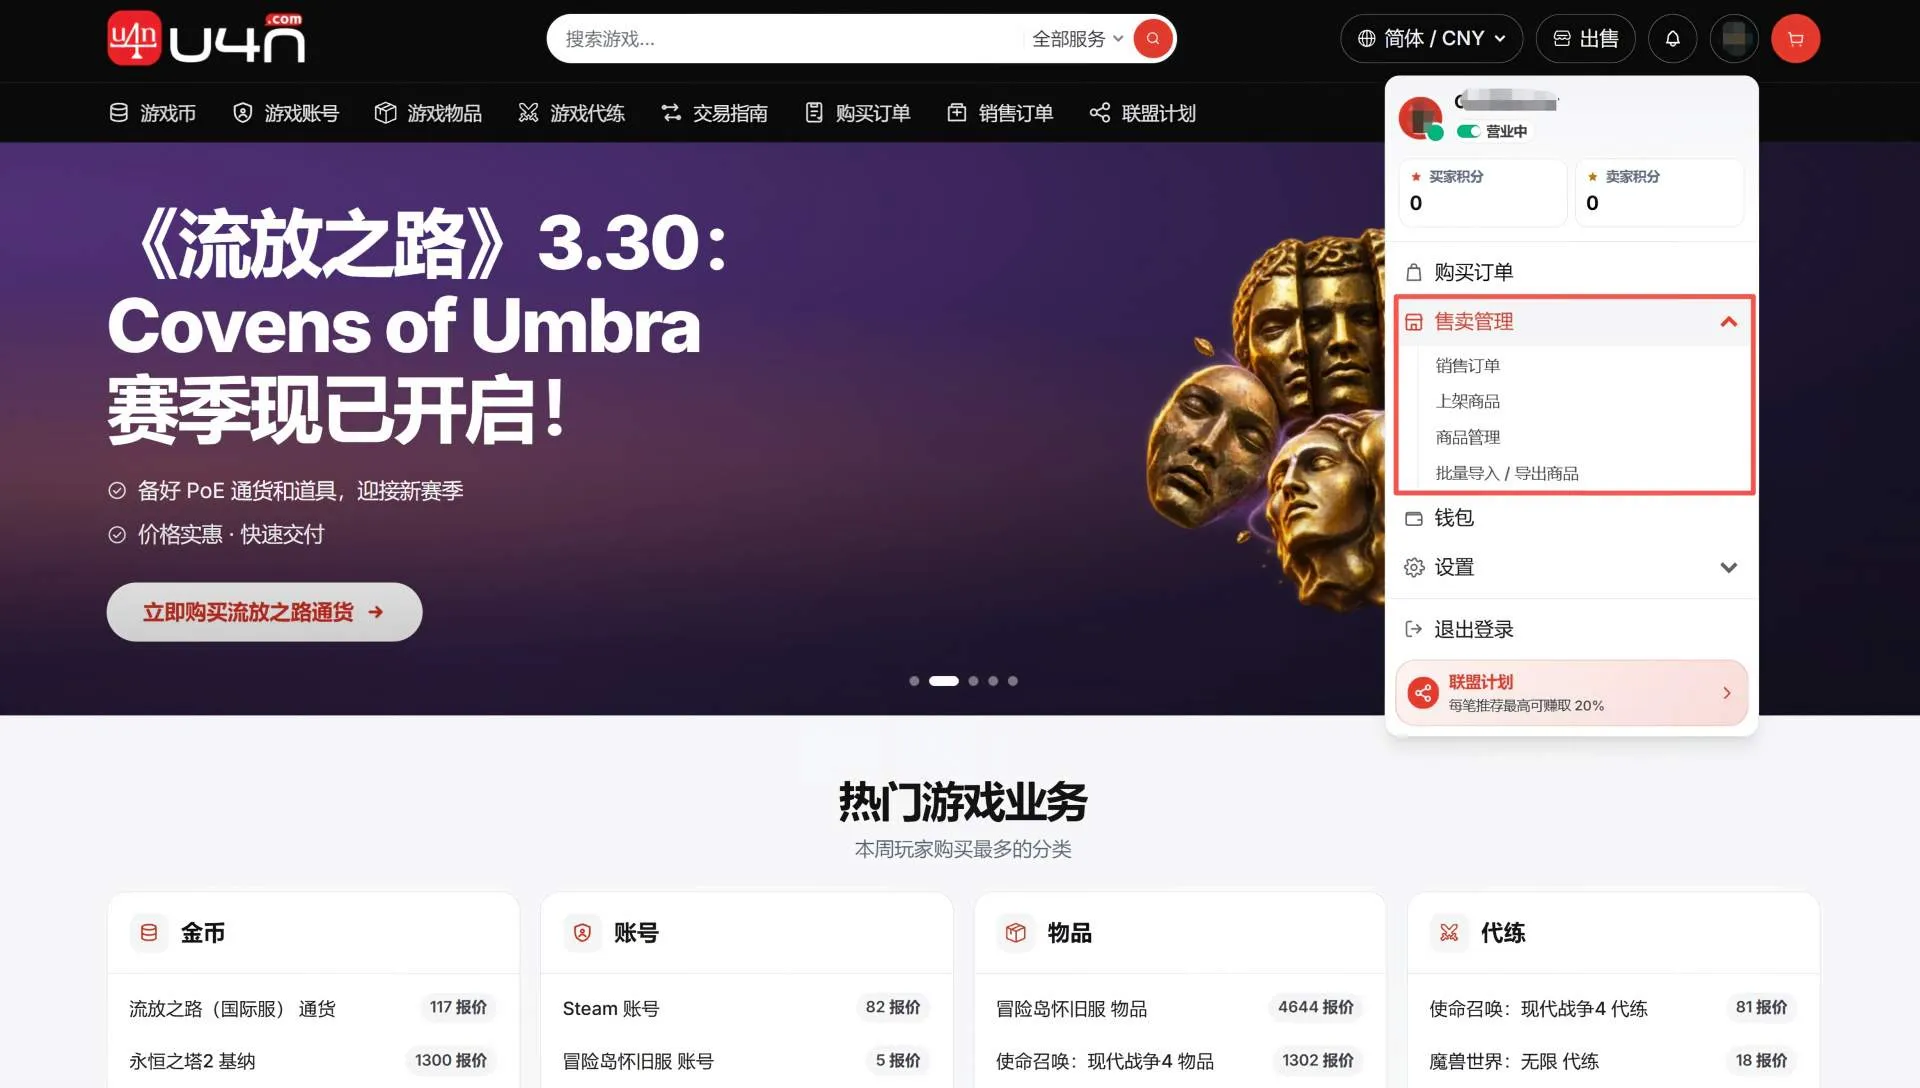
Click the avatar in the upper-right corner and expand “Seller Management”. Common options include:
- List Products:Publish products one at a time.
- Product Management:View, edit, or delist existing products.
- Bulk Import / Export Products:Add or update multiple products at once.
2. List Standardized Products: Quickly Publish Existing Catalog Items
Use this process for products that already have a standardized name and image in the system. Select the matching product, then enter the price, inventory, and delivery details.
Step 8: Select the Game, Server, and Standardized Product
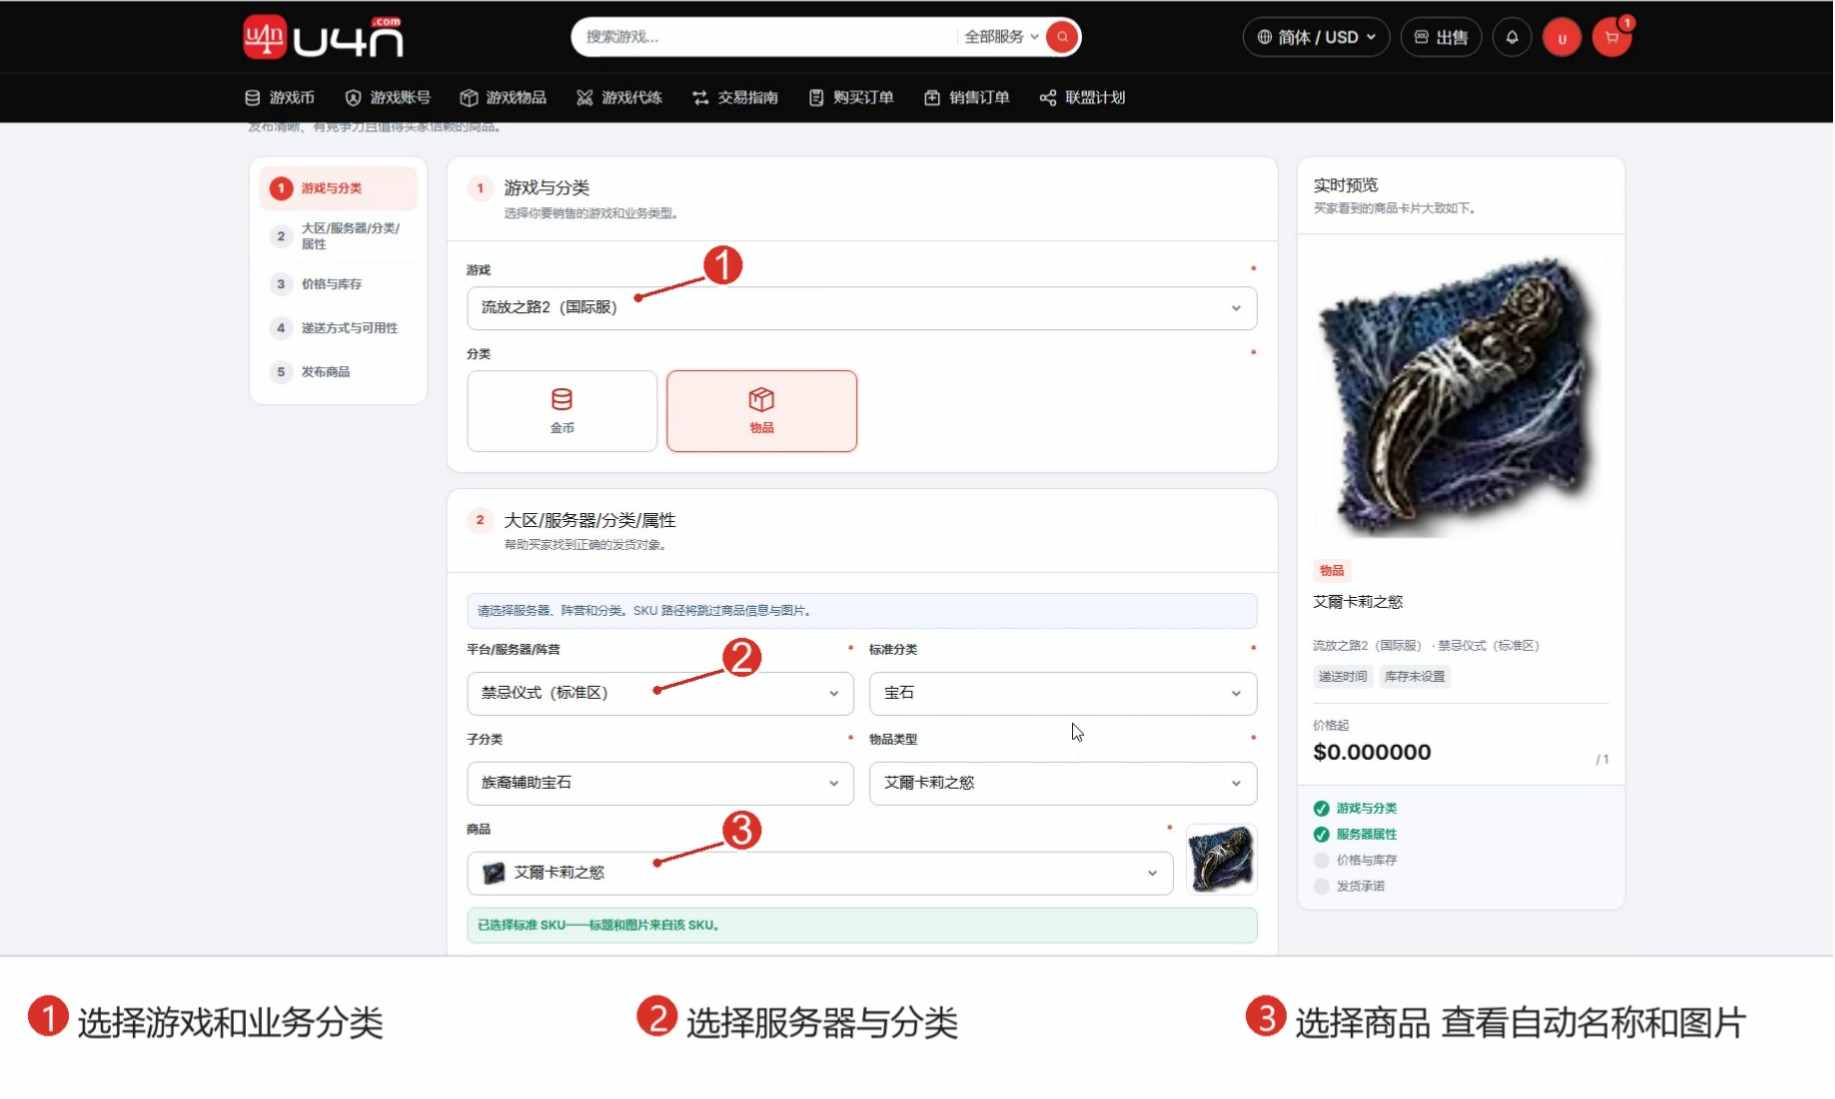
Open “List Products”, then select the game, business category, platform or server, standard category, subcategory, and specific product in order.
The system automatically displays the standardized product name and image. Carefully confirm that the game version, platform, server, and product are an exact match.
Cannot find the matching standardized product, or need to enter your own title and upload images? Use the custom product listing process。
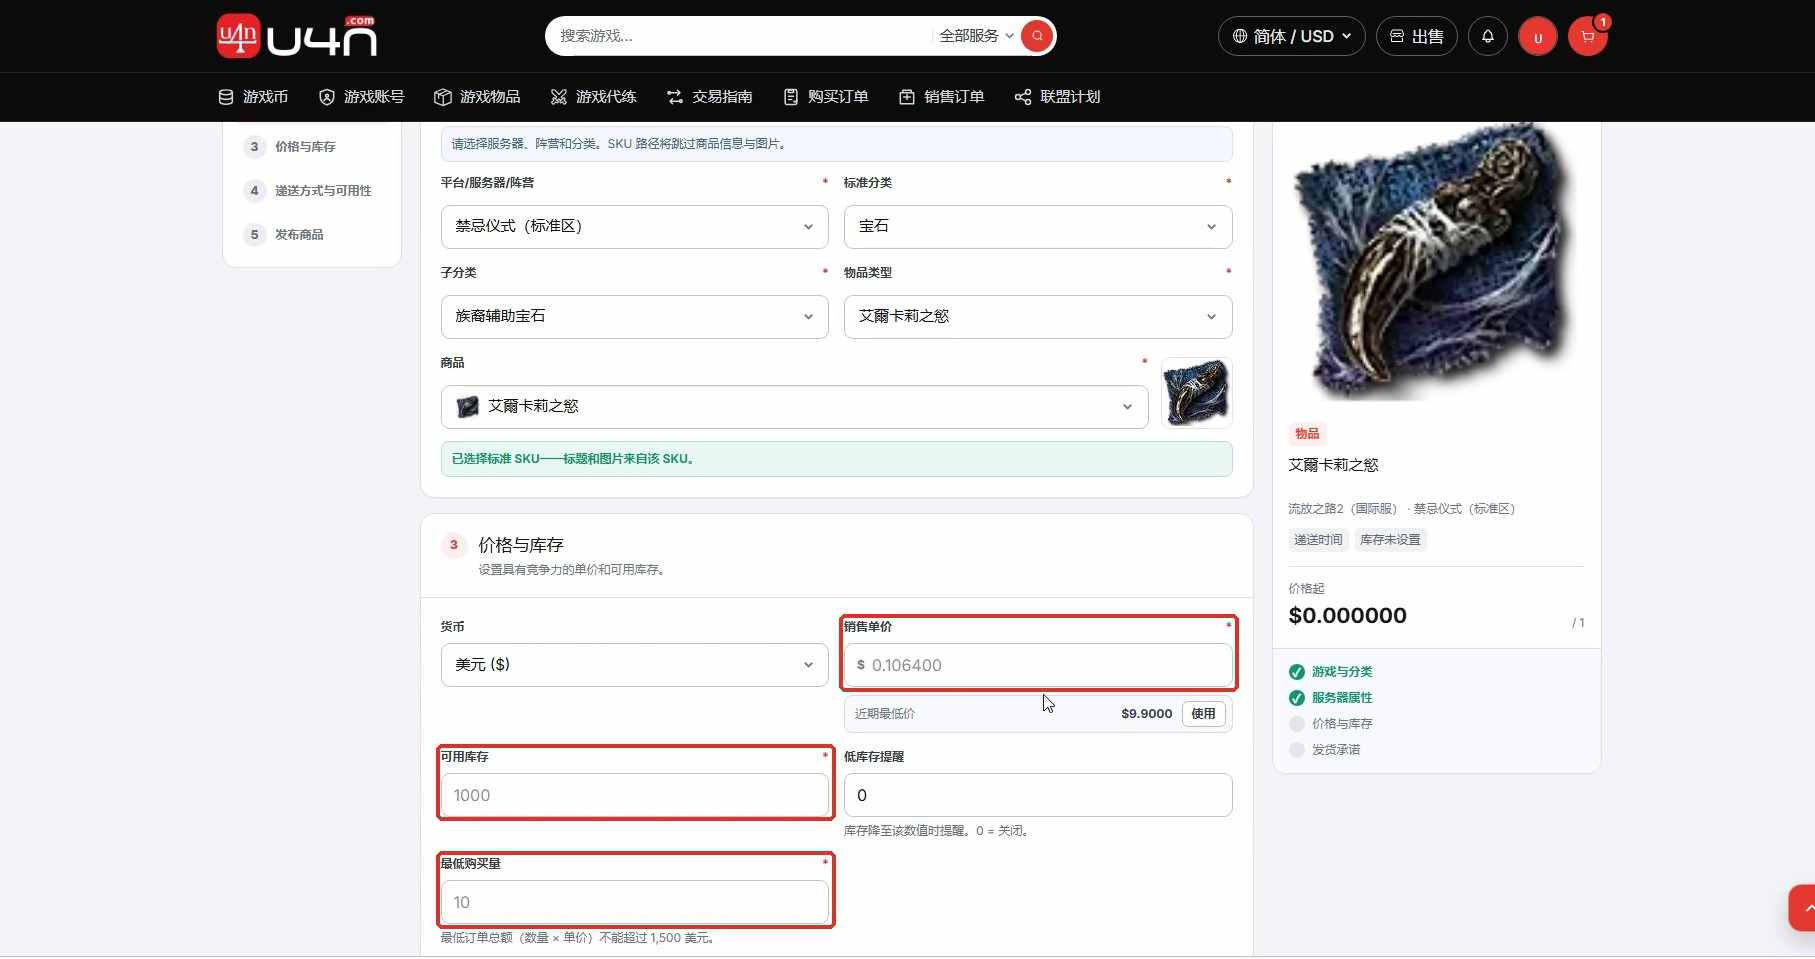
Step 9: Set the Price, Inventory, and Minimum Purchase Quantity
Enter the unit price, available inventory, and minimum purchase quantity. Set a low-stock alert if needed. Before submitting, make sure the currency, inventory, and minimum purchase quantity are consistent.
Seller experience tip: List only inventory you can deliver on time. Set a reasonable minimum purchase quantity to reduce fulfillment issues and unnecessary buyer communication.
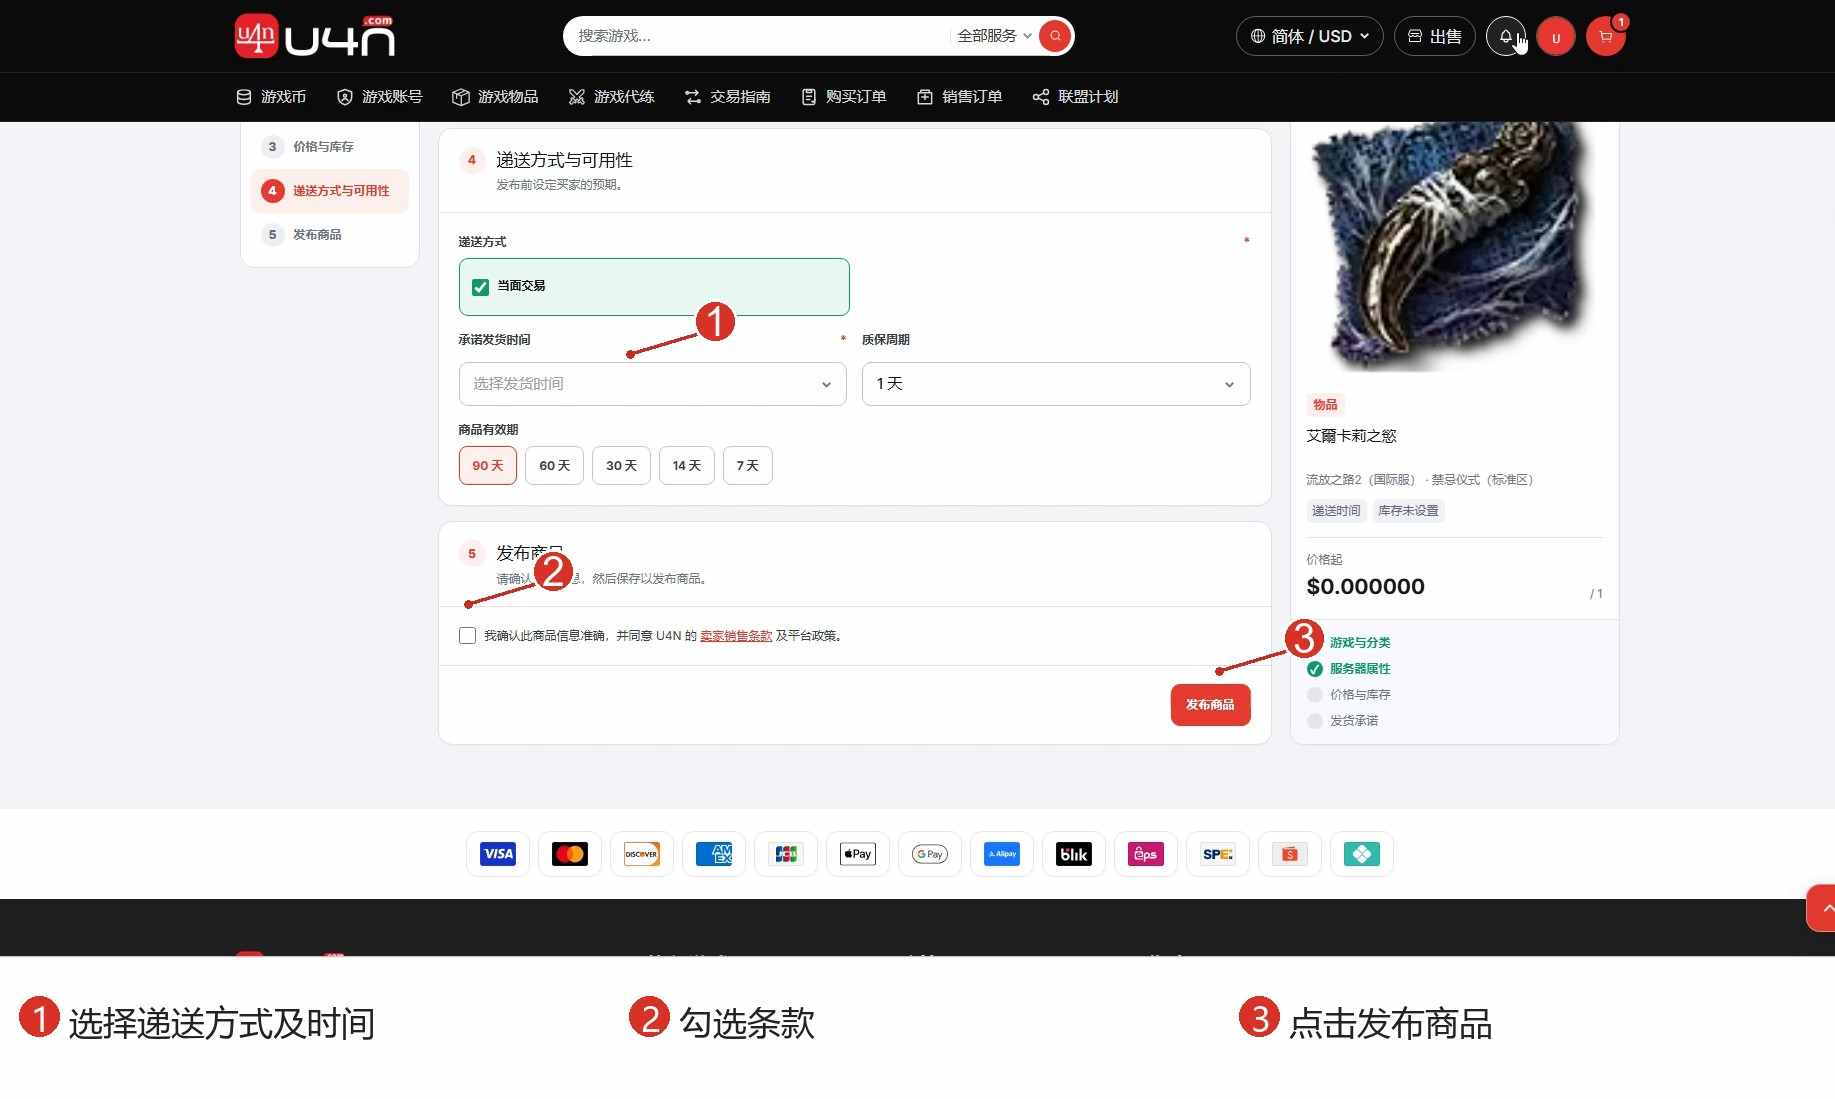
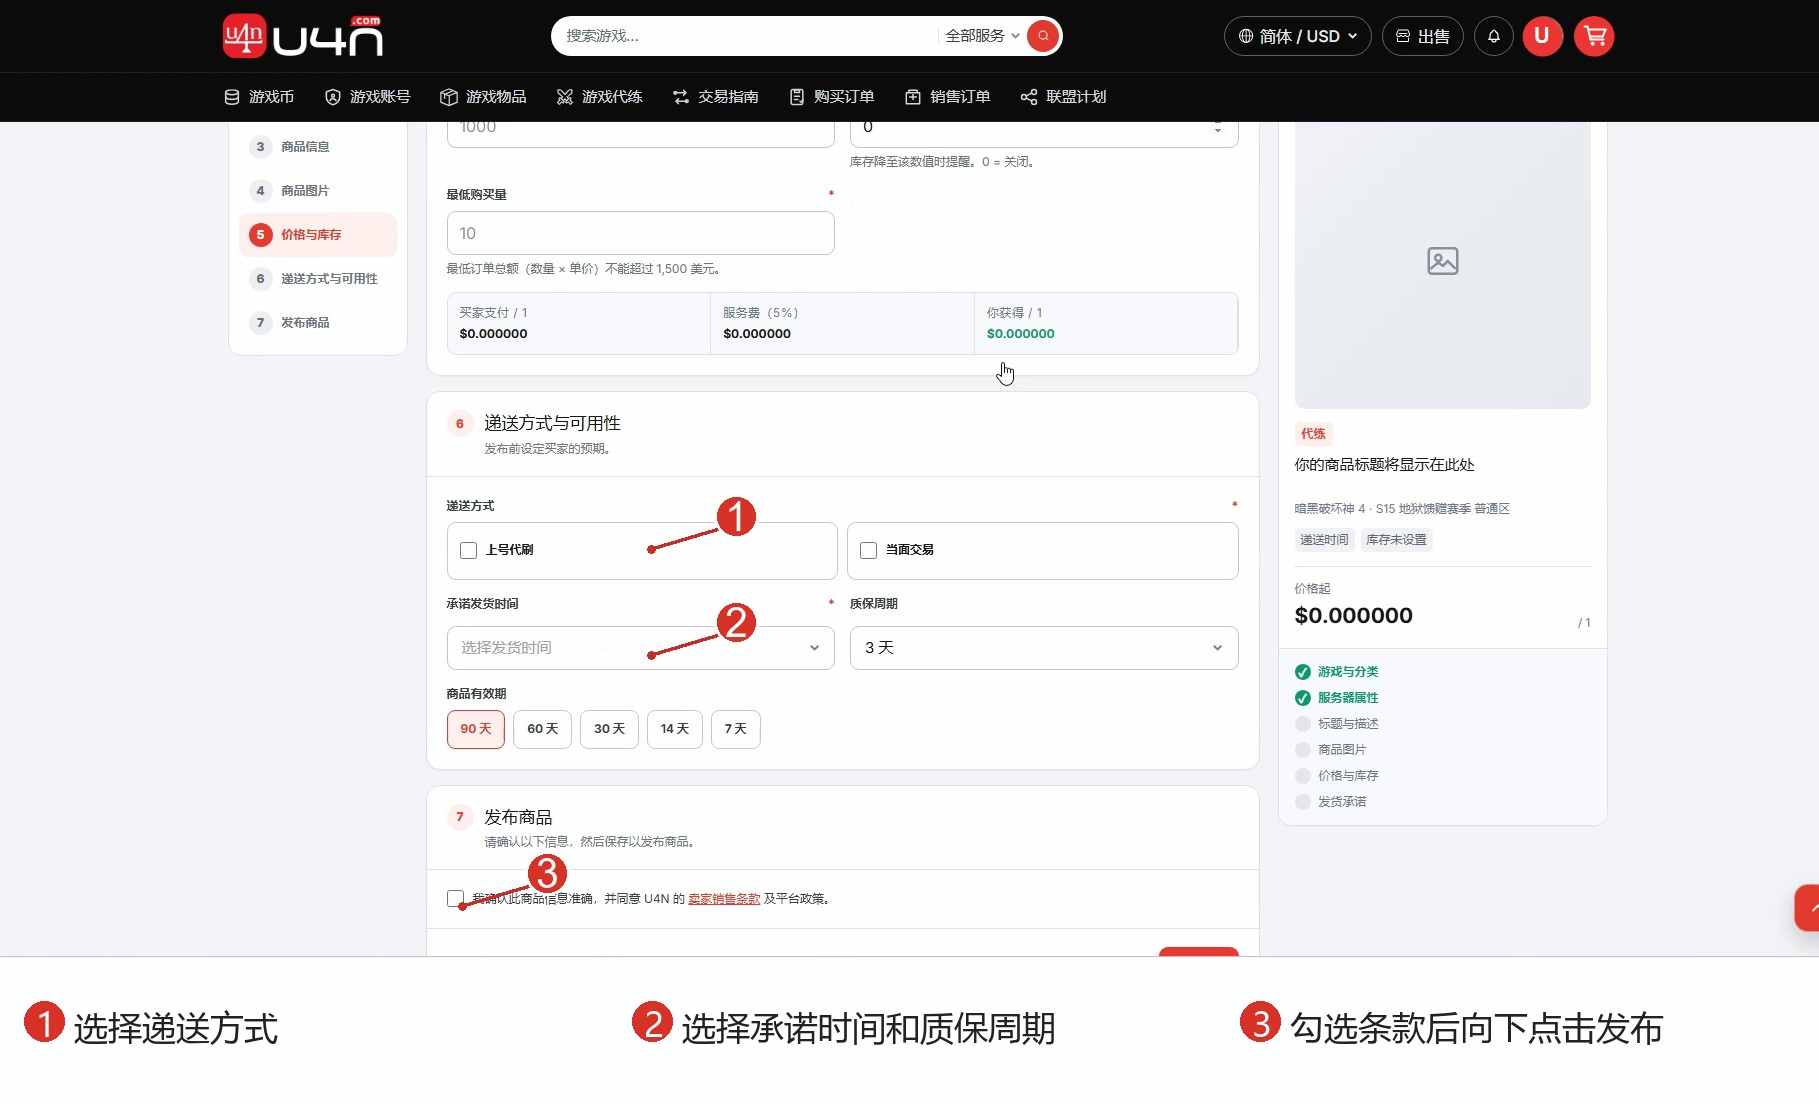
Step 10: Set Delivery Options and Publish the Standardized Product
Select the delivery methods you actually support, then enter the promised delivery time, warranty period, and listing duration. Confirm all details, accept the Seller Terms, and click “Publish Product”。
Pre-publish check:The product and server are correct, the price and inventory are accurate, the delivery commitment is realistic, and the warranty terms are clear.
3. List Custom Products: Add Your Own Title, Description, and Images
Use this process for boosting, custom services, or products without a standard SKU. A clear title, accurate images, and specific delivery details help buyers understand the offer and order with confidence.
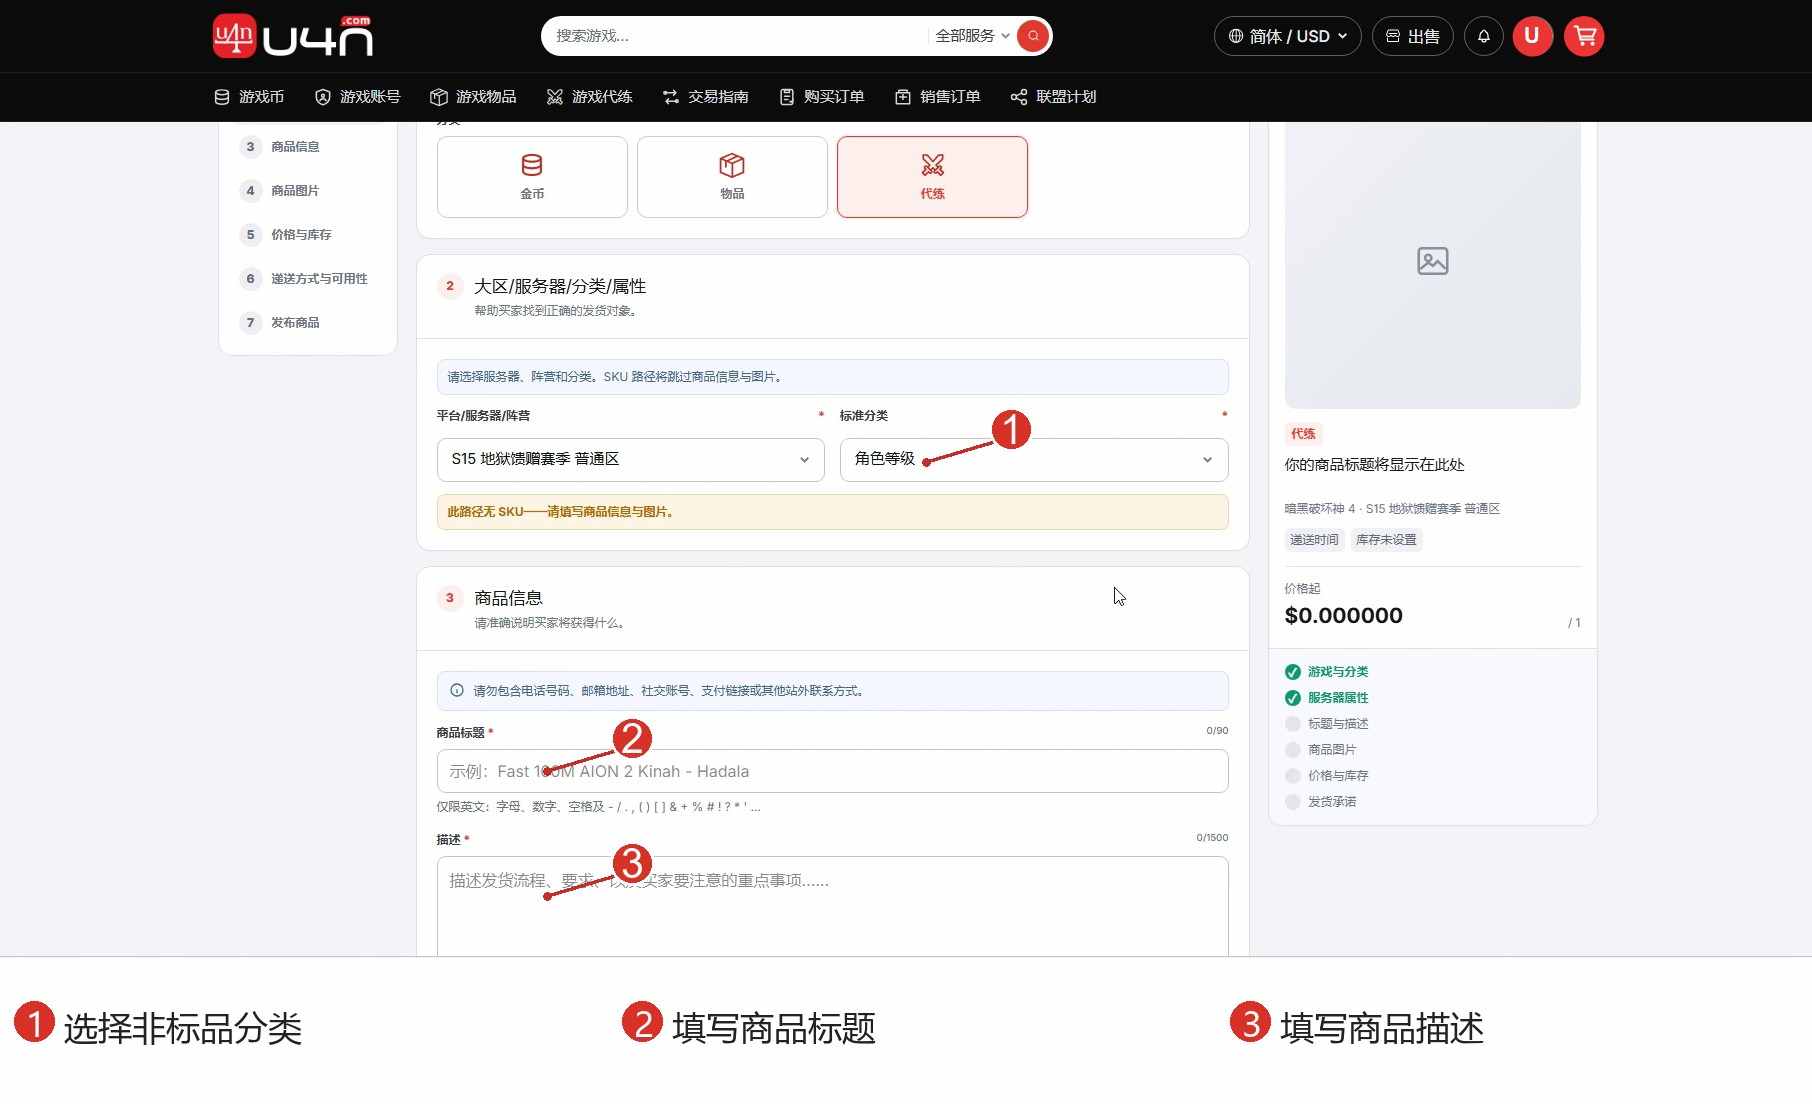
Step 11: Select a Category and Enter Product Details
Open “List Products”, then select the game, business type, server, and category. Some categories, such as boosting, may display “No SKU for this path,” which means you must enter the product details manually.
Title tip: Clearly state the game, server, and main product or service. In the description, explain what is included, the delivery process, information required from the buyer, restrictions, and after-sales coverage.
Avoid vague promises and irrelevant keywords. Accurate information reduces back-and-forth questions before purchase.
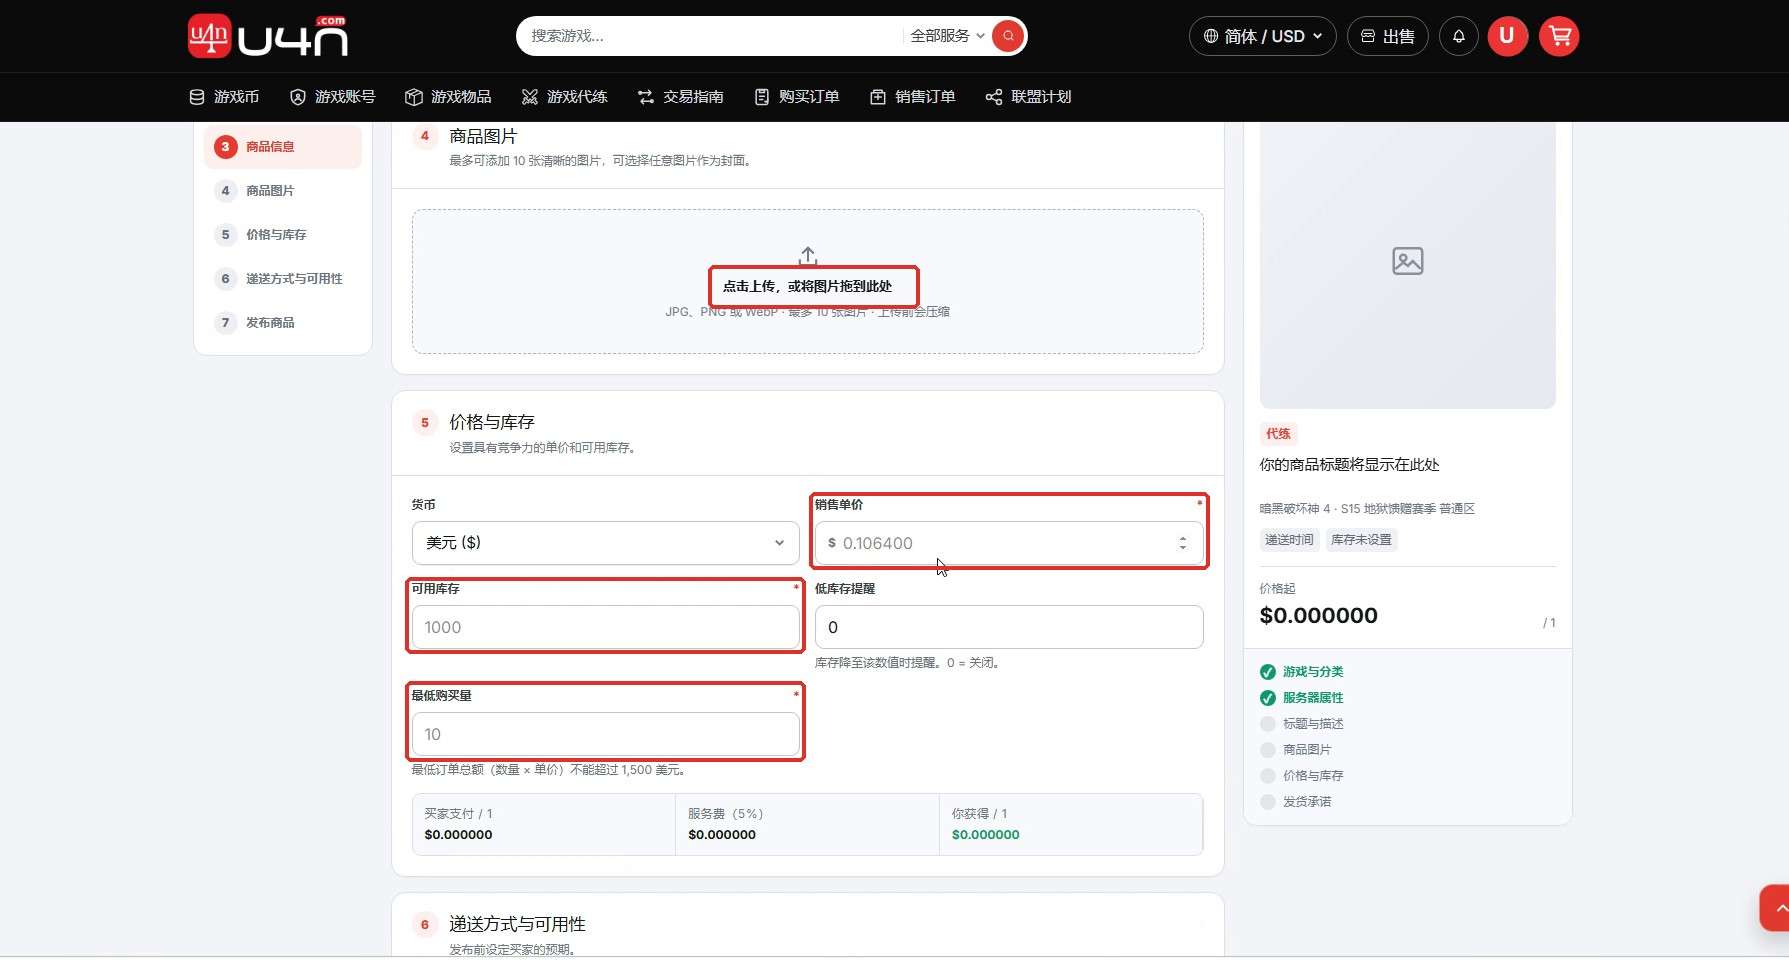
Step 12: Upload Product Images and Set Price and Inventory
Upload clear, accurate images that match the product, and choose the image that best represents the offer as the cover.
Enter the unit price, available inventory, and minimum purchase quantity, then set a low-stock alert if needed.
Image tip: Do not place potentially misleading prices, inventory, or delivery promises in the image. Use the product fields for information that changes frequently.
Step 13: Set Delivery Options and Publish the Custom Product
Select the delivery methods you actually support and set a realistic promised delivery time, warranty period, and listing duration. Verify the details, accept the Seller Terms, and click “Publish Product”。
Completion check: The product is published successfully and appears with the correct status in Product Management.
4. Manage Products After Publishing
Publishing is not the final step. Keep prices, inventory, and status current to reduce out-of-stock orders, delivery delays, and buyer confusion.
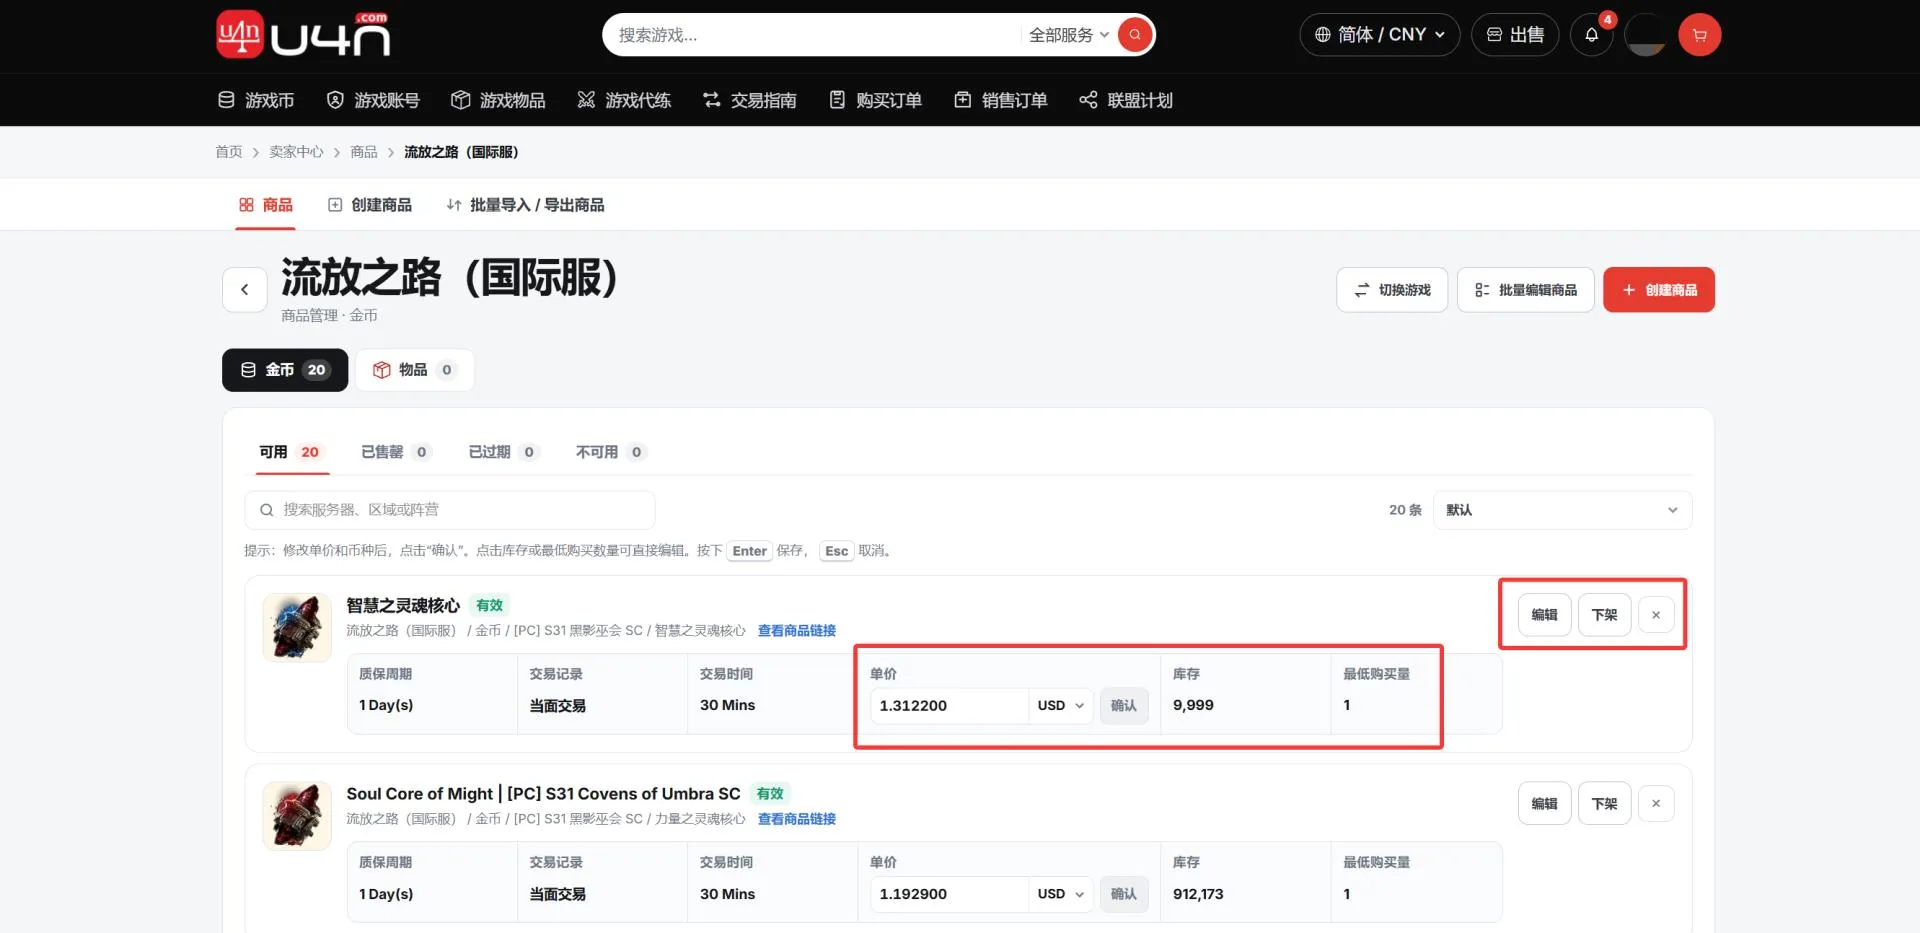
Step 14: View, Edit, or Delist Products
Open the account menu and go to “Seller Management” → “Product Management”, then select the game to view its products.
Check the product status, price, inventory, and minimum purchase quantity. Click “Edit” whenever information changes. If you cannot deliver temporarily, delist the product and republish it when supply resumes.
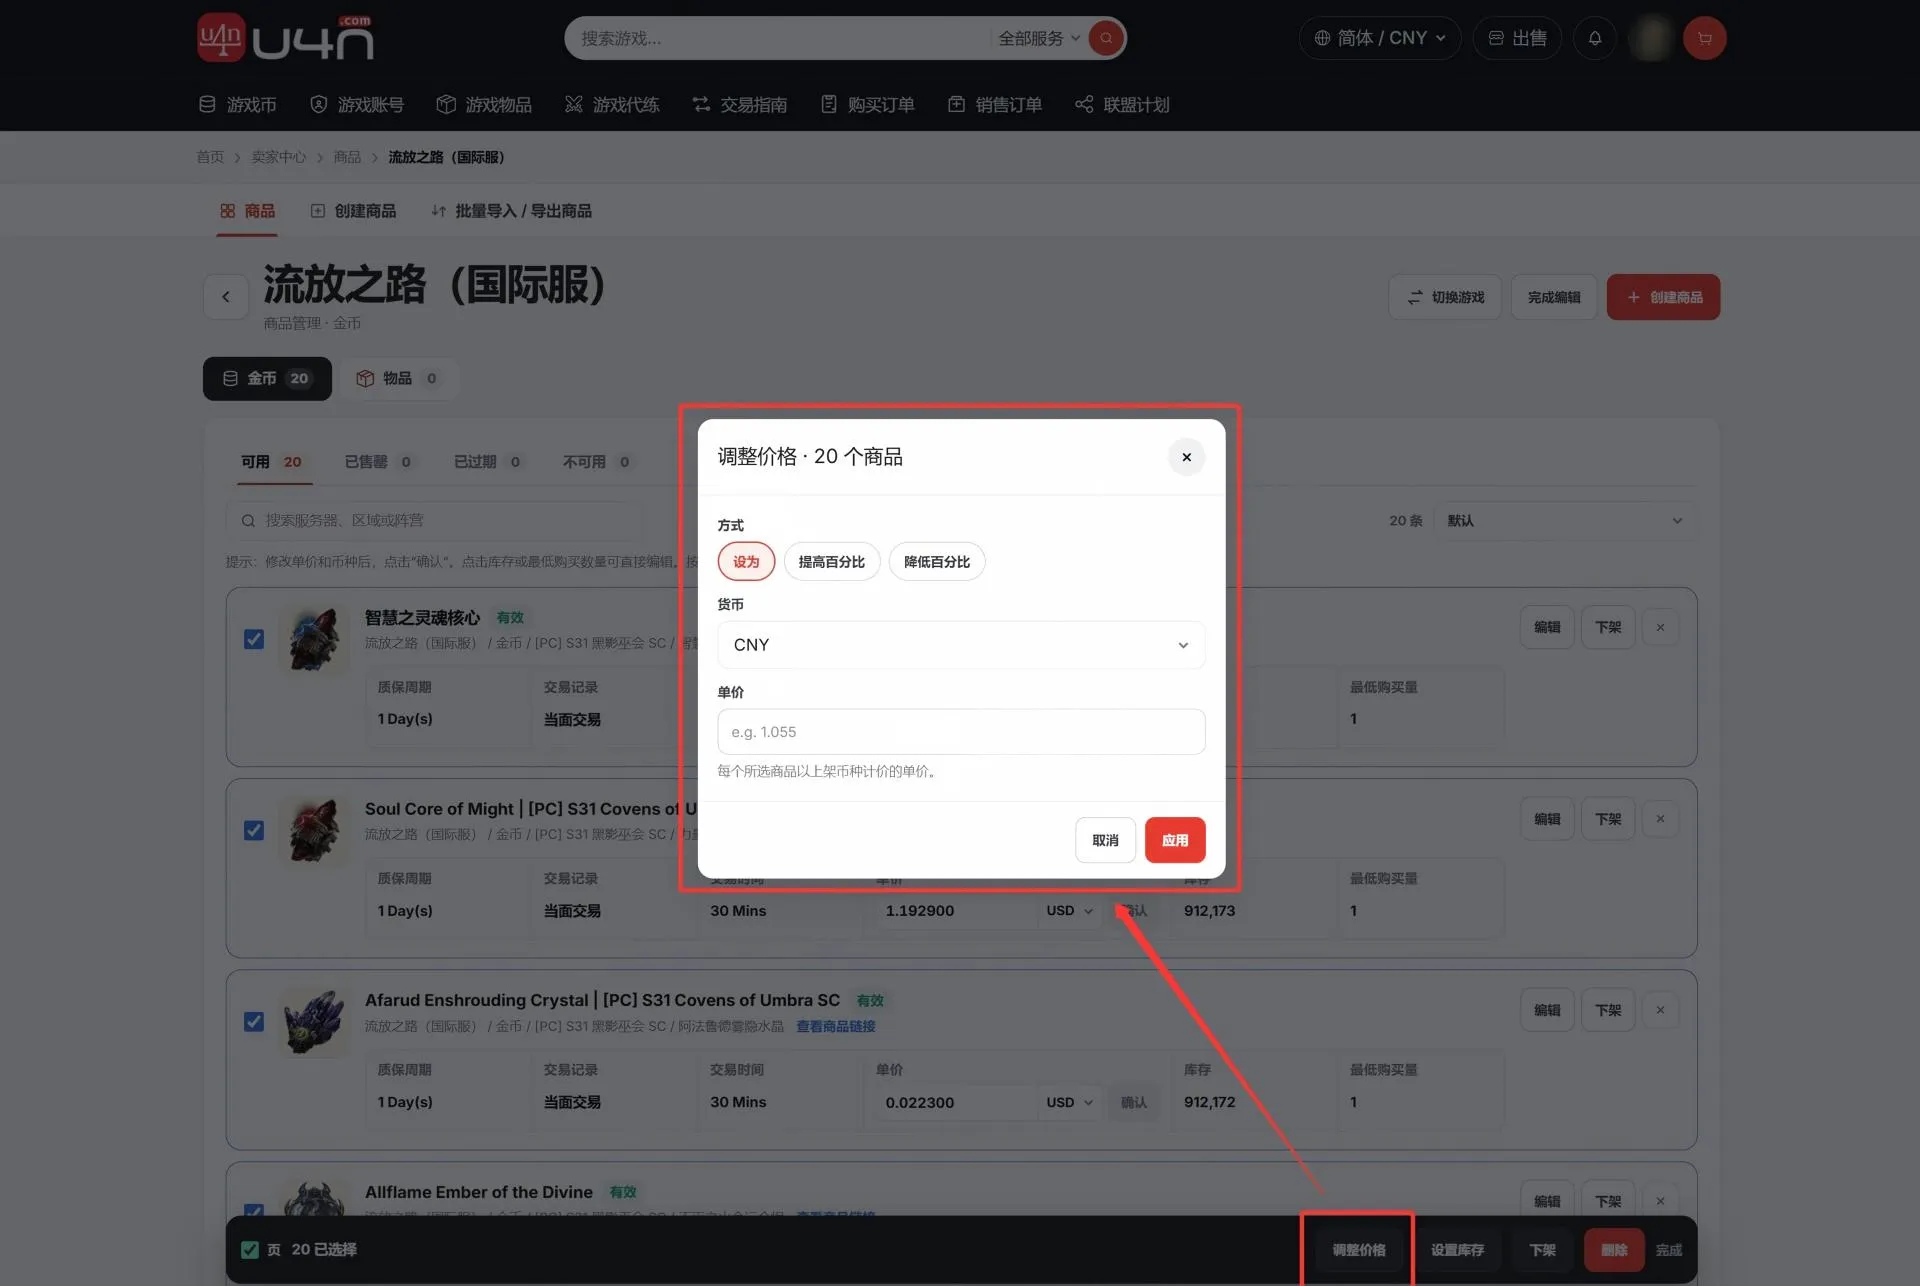
In Product Management, select bulk editing to update prices and inventory, delist products, or relist products in bulk.
5. Add, Update, and Export Products in Bulk
When managing many products, use the Excel template to reduce repetitive data entry. For your first import, test with a small number of products and scale up after confirming success.
Step 15: Open the Bulk Import / Export Page
In “Seller Management,” open “Bulk Import / Export Products”. From here, you can add products in bulk, update existing products, and export active listings.
Before uploading, check the currently supported file formats, file size, and quantity limits. Follow the latest on-screen requirements.
Step 16: Download the Latest Template for the Category
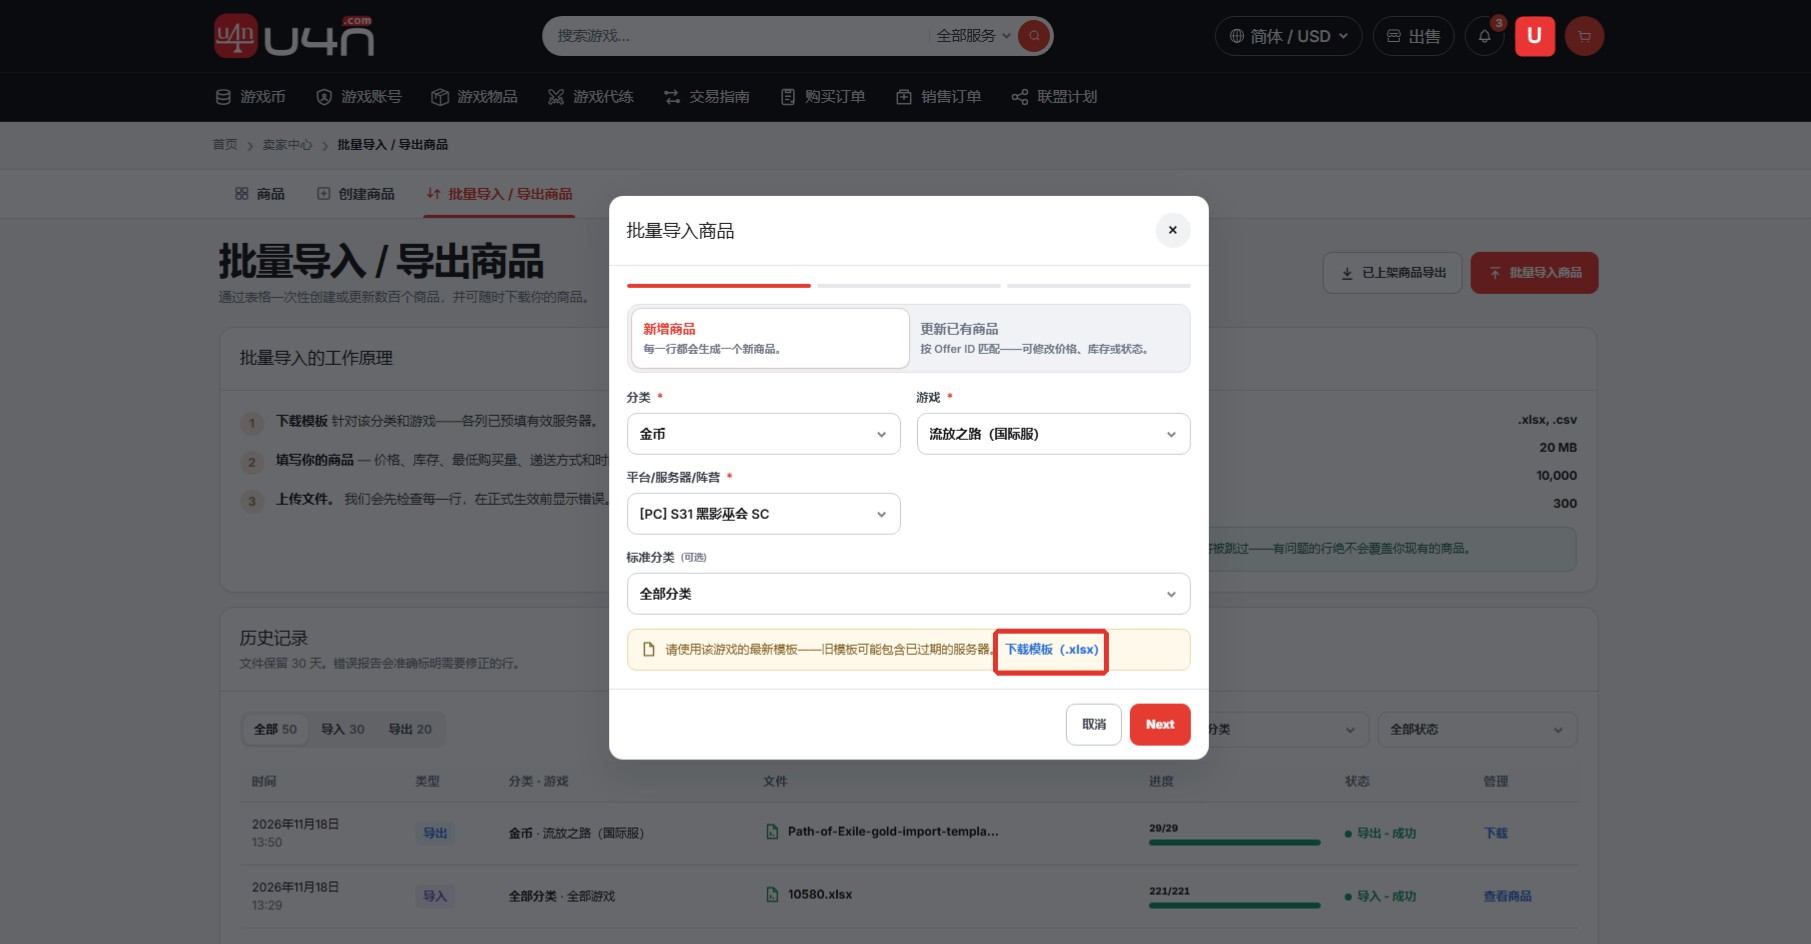
Click “Bulk Import Products,” select “Add New Products”, then select the category, game, and platform or server. If prompted, also select a standard category.
Click “Download Template (.xlsx)” to get the latest template for the selected category. Do not reuse a template from another game or server, or an outdated version.
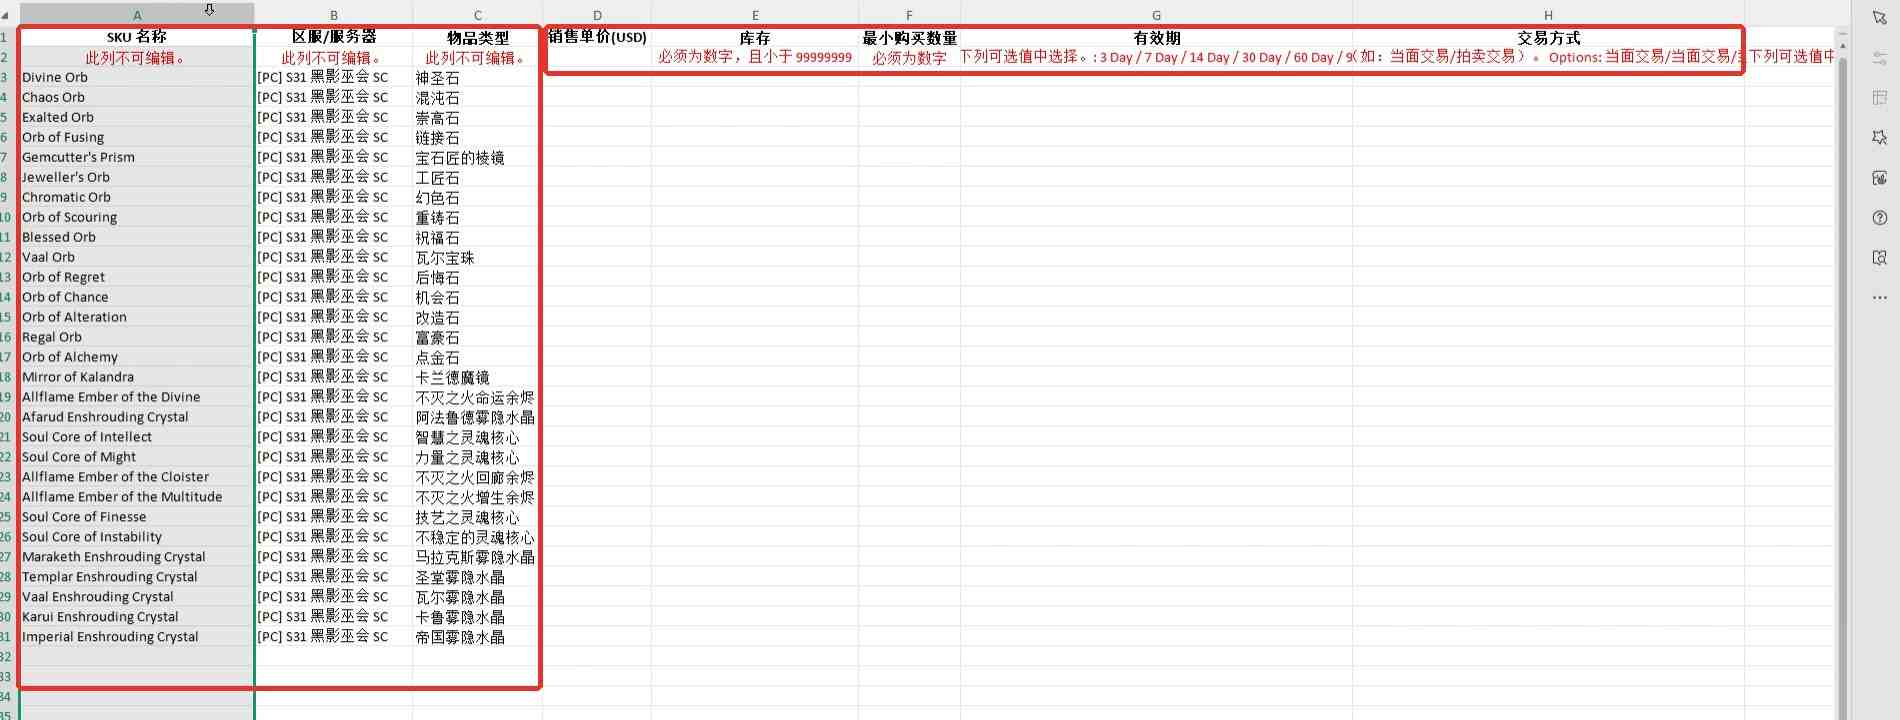
Step 17: Review the Template Structure and Locked Fields
Open the latest template. Row 1 contains column names, Row 2 contains completion rules, and product data begins on Row 3.
Columns A, B, and C are preset by the system. Do not edit them:They contain the SKU name, region or server, and item type. Before entering data, confirm that they match the product you plan to sell.
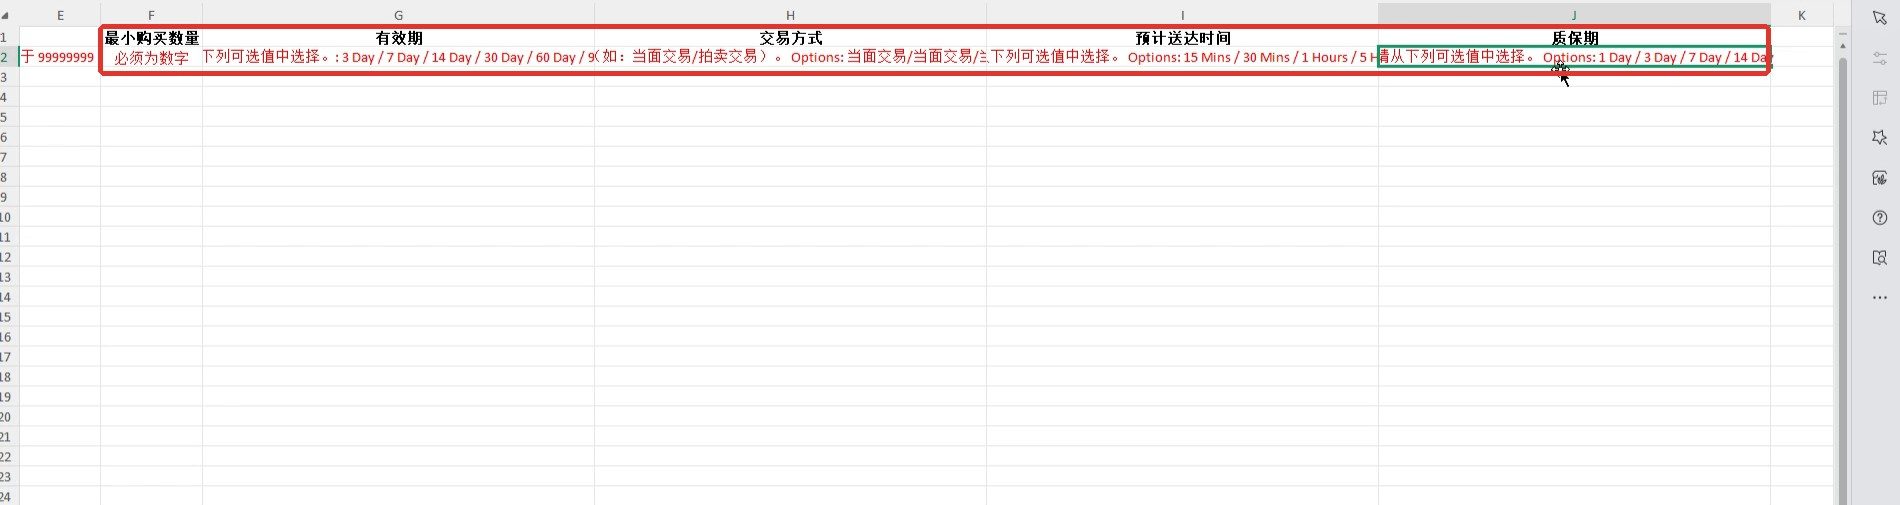
Step 18: Enter Price, Inventory, and Delivery Details
For each product, start with “Unit Price” in Column D and complete the remaining fields in the same row. The table below uses the Path of Exile international currency template as an example. For other games or categories, follow the fields and allowed values in the latest template.
| Column | Field | How to Complete |
|---|---|---|
| A, B, C (first three columns) | SKU name, region/server, item type | Preset by the system and cannot be edited. Confirm that the product and server are correct. |
| Column D | Unit Price (USD) | Enter the numeric unit price in U.S. dollars. |
| Column E | Inventory | Enter the quantity available for sale. It must be numeric and less than 99,999,999. |
| Column F | Minimum Purchase Quantity | Enter the minimum quantity a buyer must purchase per order. It must be numeric. |
| Column G | Listing Duration | Enter a value listed in the template, such as 30 Days. Available options are 3 / 7 / 14 / 30 / 60 / 90 Days. |
| Column H | Delivery Method | Use an option listed in the template, such as “Face-to-Face Trade.” Separate multiple methods with /. Follow the current template. |
| Column I | Estimated Delivery Time | Enter a value listed in the template: 15 Mins / 30 Mins / 1 Hour / 5 Hours. |
| Column J | Warranty Period | Enter a value listed in the template: 1 Day / 3 Days / 7 Days / 14 Days. |
Example: Unit price 1.50, inventory 100, minimum purchase quantity 1, listing duration 30 Days, delivery method “Face-to-Face Trade,” estimated delivery time 15 Mins, and warranty period 1 Day. This example demonstrates formatting only. Enter your actual price, inventory, and delivery capabilities.
Avoid import errors:Do not change the headers, delete preset columns, or enter values not listed in the template. Do not add currency symbols or extra text to numeric columns.
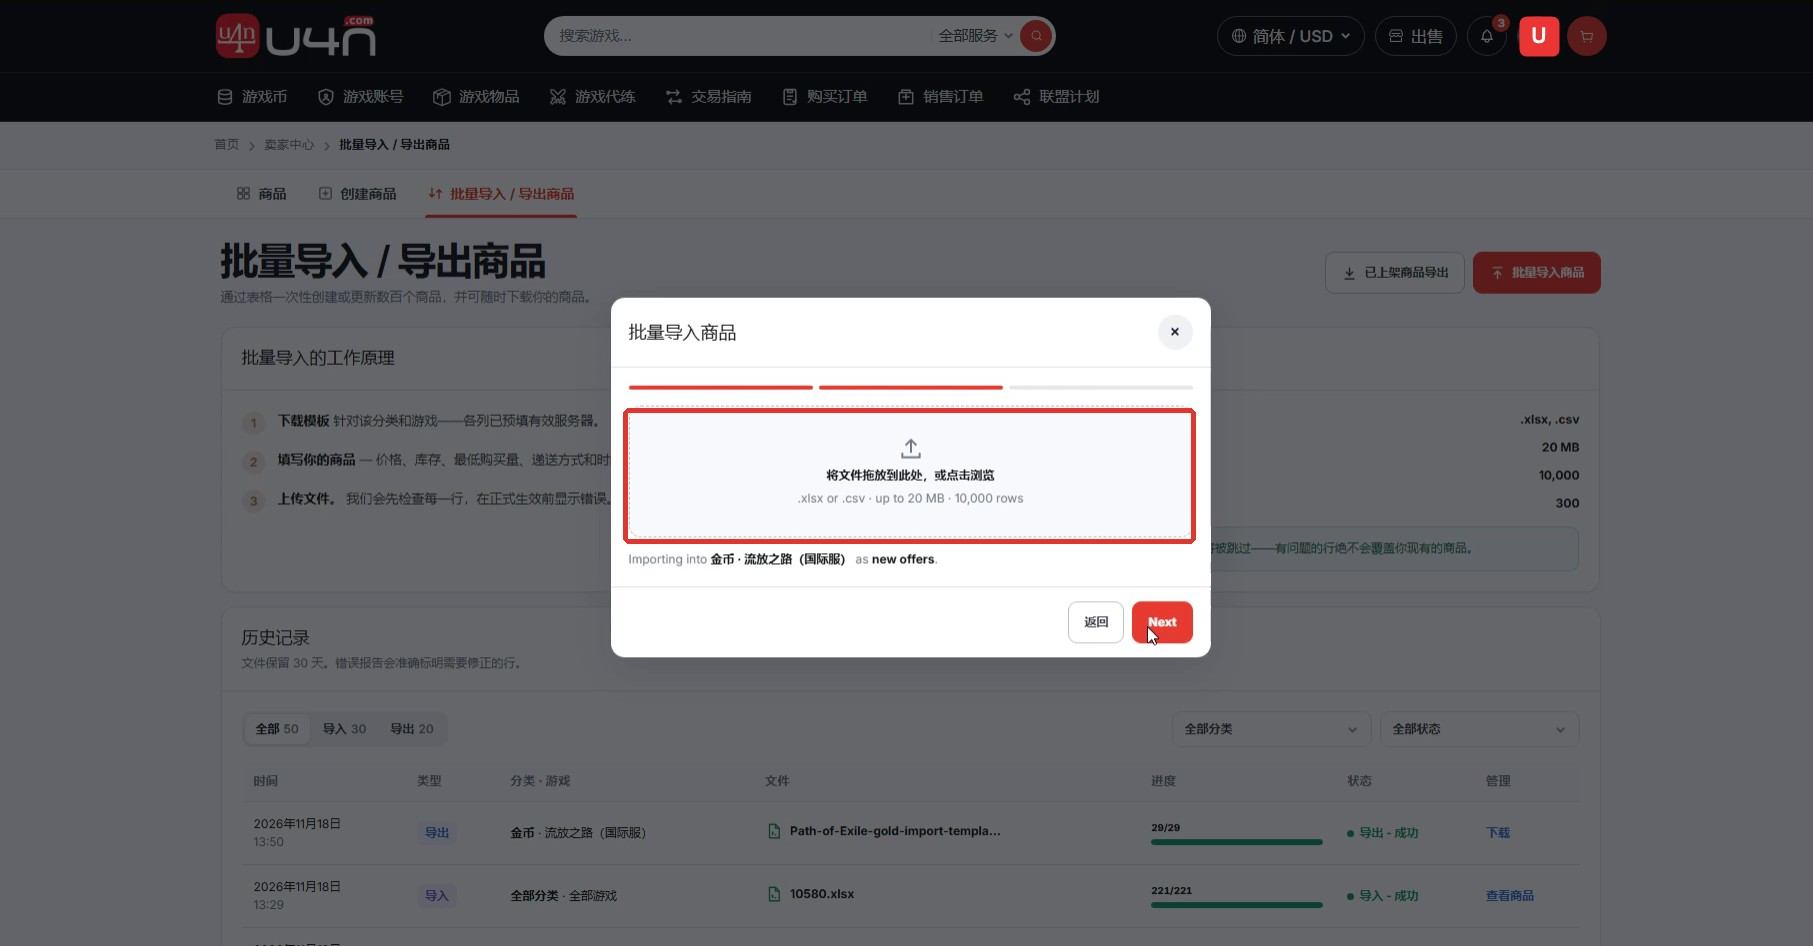
Step 19: Save, Upload, and Review the Import Results
Review each row and save the file in a supported format. Return to “Bulk Import Products,” select Add New Products and the matching category, click “Next,” and upload the completed template.
After submitting, review the results in the history. If the system generates an error report, use the listed row and field to correct the file, then upload it again.
Completion check: The import record shows success, and the new products appear in Product Management.
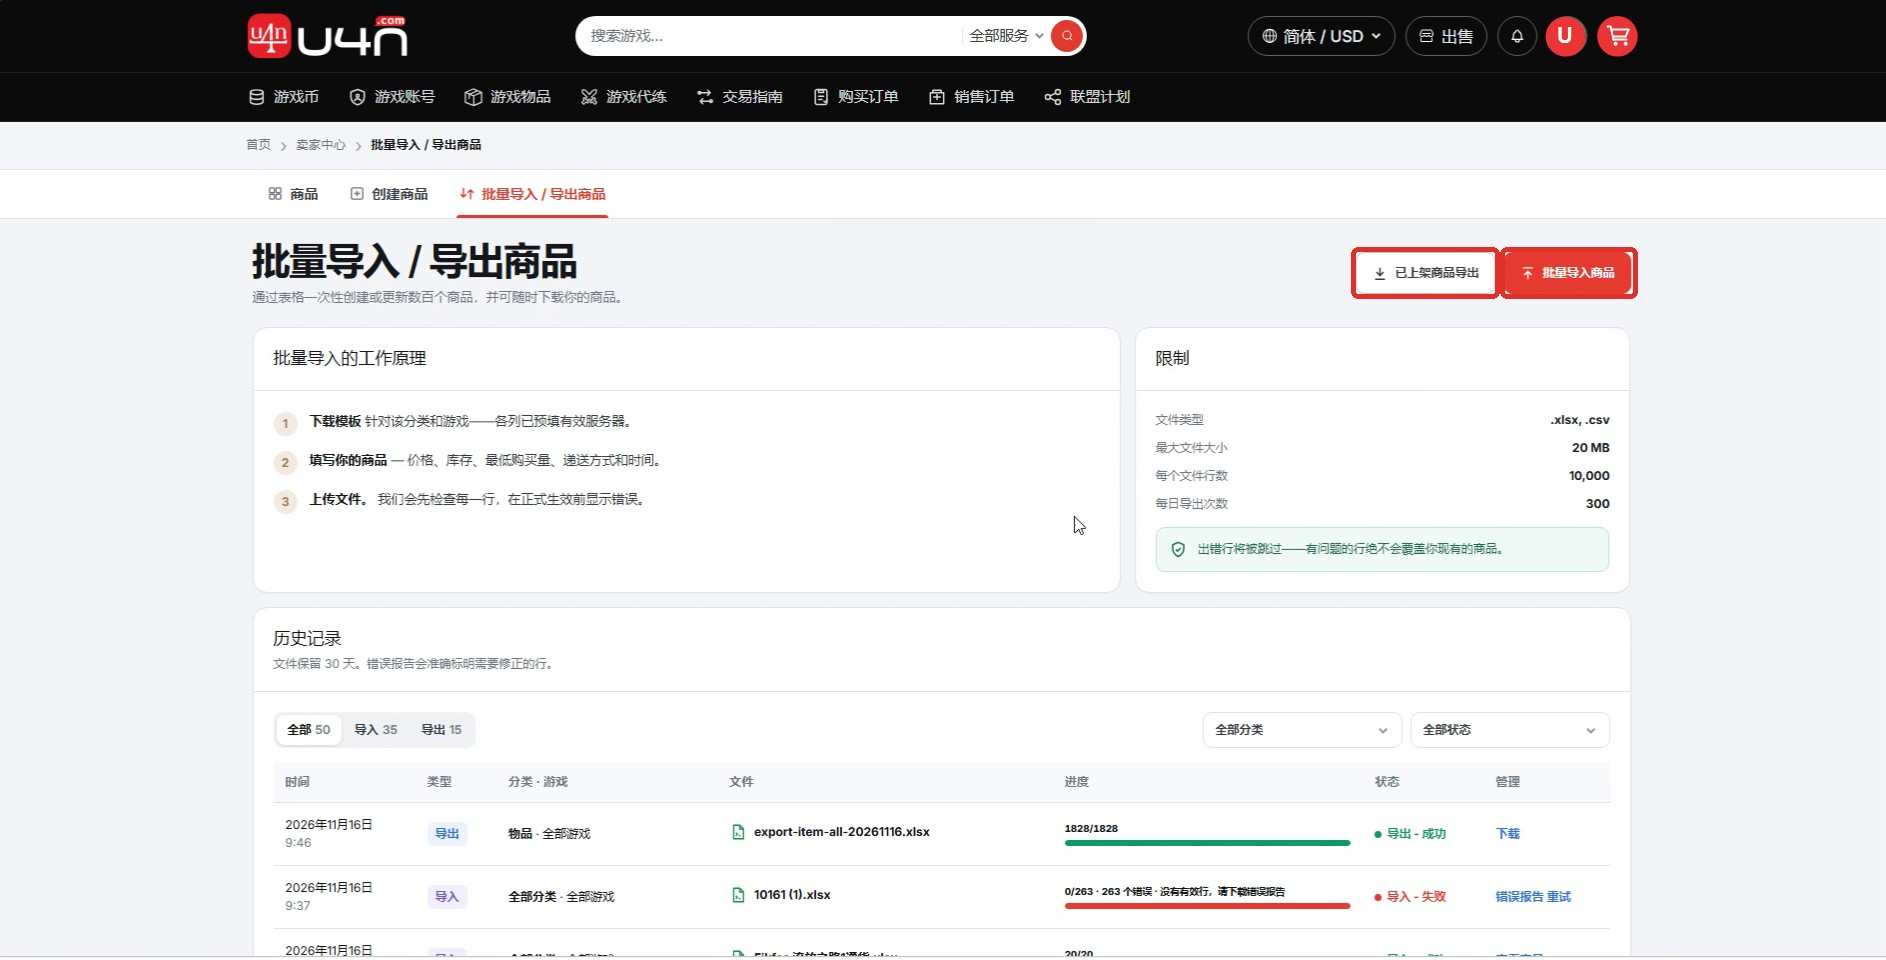
Step 20: Update or Export Existing Products in Bulk
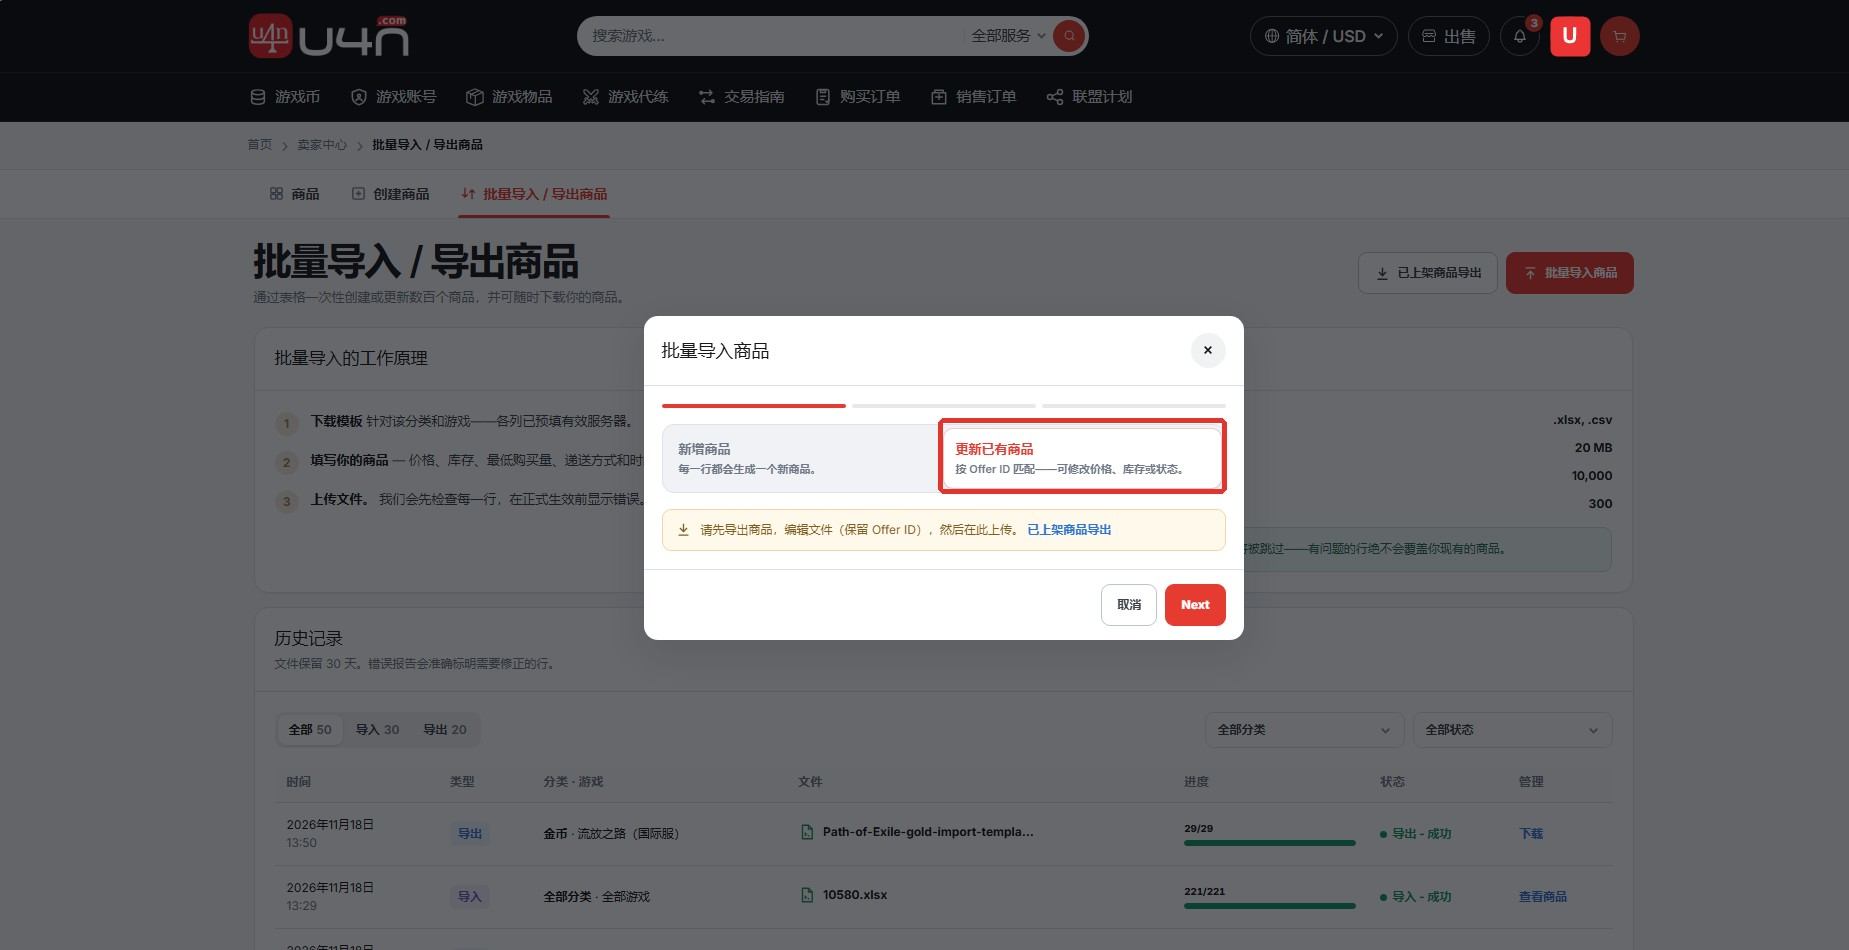
To update existing products in bulk, first select “Export Listed Products”, then use the on-screen options to generate and download the latest product file.
Edit the fields that need updating in the exported file, and be sure to keep the Offer ID. Return to “Bulk Import Products,” select “Update Existing Products,” click “Next,” and upload the file.
After the import, review the history, error report, and Product Management page to confirm that prices, inventory, and other details were updated correctly.
Step 21: Close Your Store or Disable Sales for a Game Category
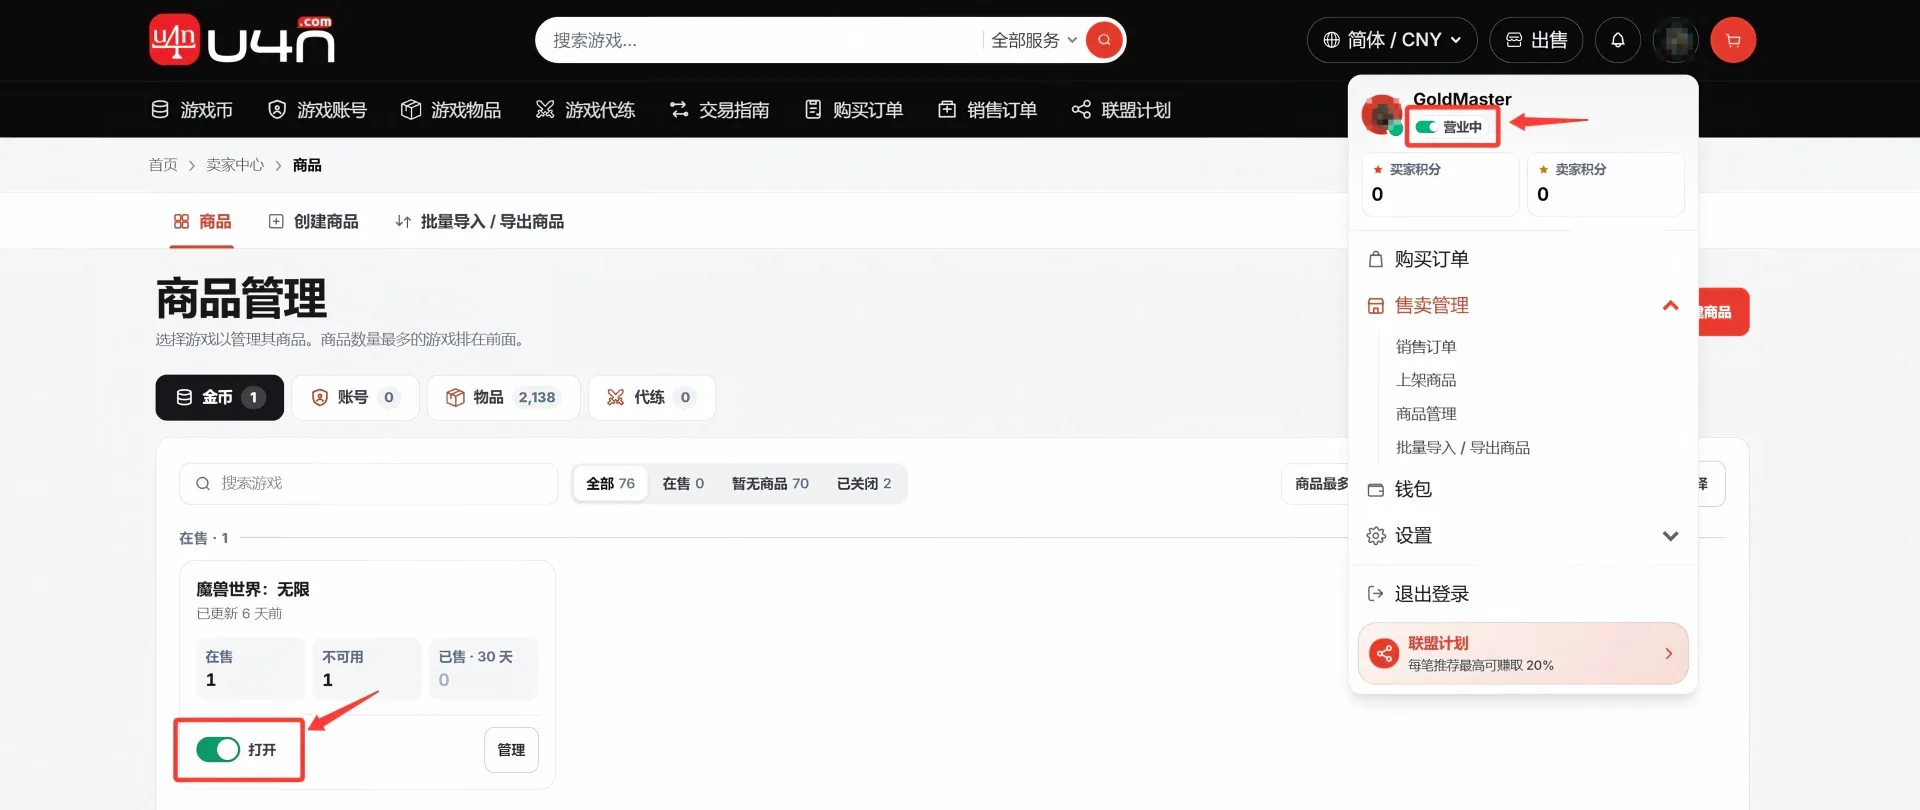
Close your store: Click your profile avatar in the header, then click “Open” to switch to offline status. All active products will be hidden from search and filter results.
Disable sales for a game category: In Product Management, find the game and category, then click the “Open” button to switch it to “Closed.” Products in the disabled game category will no longer appear in search and filter results.
U4N Seller FAQ
Should I choose a standardized or custom product listing?
If the system lets you select the product and automatically supplies a standard name and image, use the standardized product process. If the page shows no SKU, or you need a custom title, description, and images, use the custom product process.
Why did I not receive the verification email?
Email delivery may be delayed briefly. Check your spam or promotions folder and confirm that the registration email is correct. If the verification link expires, return to the page and resend it.
What should I do if a bulk import fails?
Download and review the error report. Use the row number to check required fields, numeric formats, and allowed template values. Do not change the headers or system-preset columns. Correct the file and upload it again.
What should I do after publishing a product?
Regularly review product status, price, and inventory. If you cannot meet the promised delivery time, update inventory or delivery details, or delist the product to protect the buyer experience.


