


Hajin is a large Battle Royale map in Call of Duty: Modern Warfare 4 Warzone, and choosing the right landing spot can shape the entire match. With dense urban districts, open farmland, waterfront buildings, and fortified military areas, each POI offers a different balance of loot, cover, and rotation options. Rather than dropping wherever the action looks busiest, we recommend choosing a location that matches your squad size, preferred combat style, and the first circle.
Our team has found that a good landing decision is about more than finding weapons quickly. You also need enough time to secure armor, prepare your loadout, and avoid getting caught in an early fight without proper equipment. Even players focused on MW4 Boosting can benefit from learning these landing patterns, since a consistent opening makes it easier to build momentum throughout a match. Here are the Hajin locations worth considering and how to approach each one.
Understanding Hajin's Map Layout
Hajin features 13 major POIs, with a mixture of city streets, farmland, rivers, forests, and fortified military locations. This variety creates different landing opportunities, but it also means that one strategy will not work everywhere.
Urban locations generally offer more buildings and close-range combat opportunities. Rural areas provide more space to spread out, although open sightlines can leave players exposed. Military facilities and other fortified locations can offer defensible structures, but reaching the next circle may require an early rotation.
Before jumping, we recommend checking three things:
- First Circle: Identify whether your intended POI is inside or outside the first safe zone.
- Squad Size: A full squad needs enough nearby buildings and loot opportunities to gear up without splitting too far apart.
- Combat Preference: Decide whether you want an early fight, a quieter start, or a position that makes mid-game rotations easier.
The best landing spot is not necessarily the one with the most loot. A location that lets your team gear up and leave safely can be more valuable than a crowded hotspot.
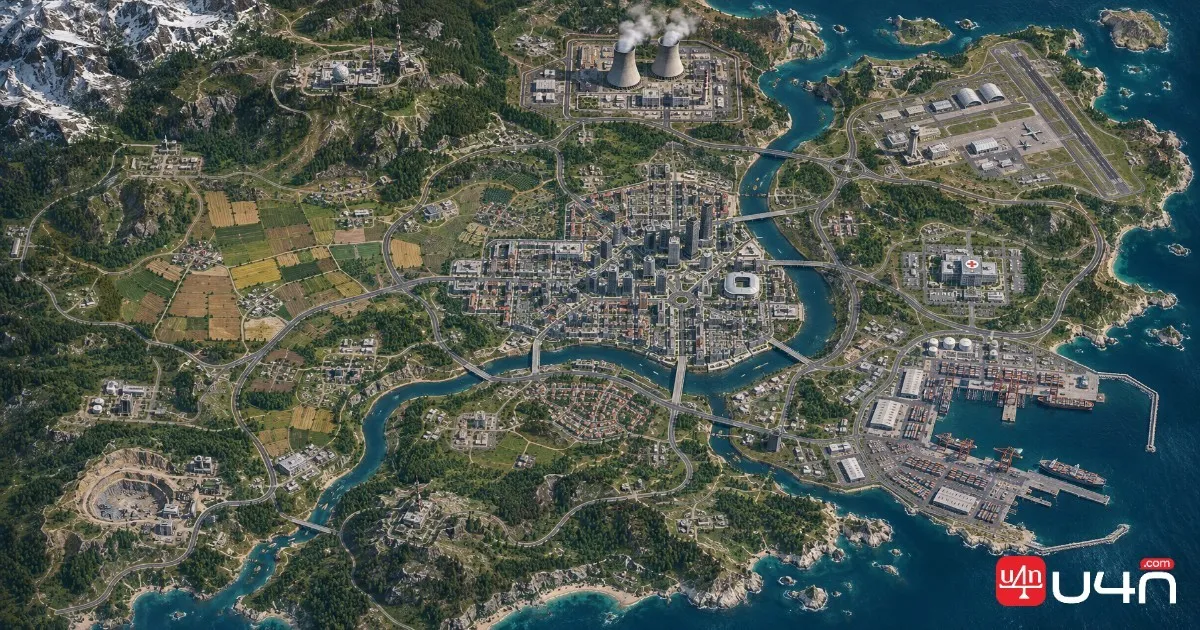
Best Drop Locations on Hajin Compared
The following locations stand out for different reasons. We recommend comparing their strengths and risks before committing to a drop.
| Drop Location | Best For | Main Advantage | Main Risk |
|---|---|---|---|
| Hajin City | Aggressive squads | Dense buildings and flexible rotations | Heavy early-game traffic |
| Imjin Farmland | Safer starts | More space to loot | Limited cover and long sightlines |
| Mirae General Hospital | Solo players | Compact loot area and indoor cover | Can become contested |
| Songdo Wharf | Fast looting | Waterfront buildings and nearby routes | Exposed movement |
| Cheongun Village | Balanced play | Buildings and flexible rotations | Nearby squad traffic |
| The Grid | Hot drops | Central position and high-tier loot potential | Frequent early fights |
| Chang-san Air Base | Aggressive squads | Military-style loot and open combat space | Potentially long rotations |
| Haneul Nuclear Reactor | Prepared squads | Defensible structures | Radiation area and difficult rotations |
| 14th Political Prison | High-risk players | Valuable loot and defensive positions | Very high player traffic |
| Wolves Stadium | Mid-map control | Central positioning and clear routes | Open approaches and third parties |

Hajin City: Best Overall Drop
Hajin City is our strongest all-around recommendation for squads that want a mixture of loot, cover, and rotation flexibility. Its tall buildings, barricaded streets, and fortified positions give teams several ways to approach early engagements.
Instead of dropping directly onto the busiest towers, we recommend landing along the city's outer edge. Clear two or three nearby buildings, collect your first weapons and armor, and then decide whether to push toward the center. This approach gives your squad a chance to prepare before taking on teams already fighting in the main districts.
Imjin Farmland: Best for a Safer Start
Imjin Farmland is a solid choice for players who prefer looting before committing to a fight. Its open layout can make early encounters less concentrated, but the lack of consistent cover creates another problem.
Use buildings, fences, and parked vehicles to avoid exposing yourself to long-range fire. We also recommend checking the first circle before spending too much time searching isolated areas. Farmland works particularly well when the zone moves toward central or eastern Hajin.
Mirae General Hospital: Best for Solo Players
Mirae General Hospital offers a compact loot area, medical supplies, and indoor cover. These features make it attractive for solo players who want to secure basic equipment without spreading across several distant buildings.
Start with the surrounding structures before entering the main hospital. Once you have enough equipment, use the interior to hold angles and watch nearby roads. Be careful when the circle pulls east, as the area can attract additional players looking for a defensible position.
The Grid and Other High-Risk Locations
The Grid is one of the strongest choices for players who actively seek early fights. Its central location, high-tier loot potential, and late-game positioning make it attractive, but that also means multiple squads may arrive almost immediately.
Land on the outer buildings, secure your equipment, and push inward once your team is ready. Rooftops and alleys provide useful ways to approach opponents without moving directly through exposed streets.
Other aggressive options include Chang-san Air Base and 14th Political Prison. The former offers wide combat spaces and military-style loot, while the latter combines valuable equipment with strong defensive positions. Both can reward confident squads, but neither should be treated as a guaranteed easy start.
Best Hajin Drops for Different Playstyles
Not every squad should follow the same landing strategy. We prefer choosing a POI based on how confidently your team handles early engagements and how much time it wants to spend looting.
| Player Type | Recommended Locations | Landing Strategy |
|---|---|---|
| Aggressive squads | The Grid, Hajin City, Chang-san Air Base, 14th Political Prison | Gear up quickly and challenge nearby teams |
| Solo players | Mirae General Hospital, Songdo Wharf, Cheongun Village, Imjin Farmland | Prioritize compact loot routes and avoid unnecessary fights |
| Controlled rotations | Wolves Stadium, Cheongun Village, Imjin Farmland, Mirae General Hospital | Focus on positioning and safe movement |
For Aggressive Squads
If your squad enjoys early engagements, The Grid and Hajin City are worth considering. Both offer opportunities to fight around buildings and control important sections of the map.
We suggest keeping teammates close enough to provide support. Splitting across several buildings may increase your loot coverage, but it also makes it easier for another squad to isolate one player.
For Solo Players
Solo players should prioritize locations where they can collect equipment without immediately fighting multiple opponents. Mirae General Hospital is a particularly practical option because of its compact layout and indoor cover.
Songdo Wharf and Cheongun Village are alternatives when you want more flexibility. Imjin Farmland can also work well, provided you pay attention to long sightlines and nearby vehicles or buildings that can provide cover.
For Players Who Prefer Controlled Rotations
Wolves Stadium, Cheongun Village, and Imjin Farmland are worth considering when your priority is reaching the next zone with enough equipment and health.
The goal is not to avoid every fight. Instead, choose engagements that give your team a positional advantage. We would rather enter the next circle with reliable equipment and enough resources than spend too long chasing opponents across exposed terrain.
How to Rotate After Landing on Hajin
A good landing is only the beginning. Your next decision should be how to move away from the POI without losing the advantage you gained during the opening minutes.
Early Game: Secure Essential Equipment
After landing, focus on the basics before searching every building.
- Find a usable primary weapon and enough ammunition.
- Collect armor and essential medical supplies.
- Check nearby buildings for enemy activity.
- Keep your squad within a reasonable supporting distance.
- Review the first circle before extending your looting route.
We recommend avoiding unnecessary fights when your team still lacks basic equipment. An early elimination can erase the advantage of landing in a strong location.
Mid Game: Plan Your Next Move
Once your squad has enough equipment, start preparing for the next rotation. If you land at an isolated POI such as Imjin Farmland or Chang-san Air Base, leaving early becomes especially important when the circle moves away.
Use buildings and available terrain for cover rather than running directly across open roads. At Songdo Wharf, for example, moving inland before the zone closes is a sensible approach. At Hajin City, use the streets and buildings to avoid unnecessary exposure while leaving the central districts.
Late Game: Prioritize Positioning
During the later stages, positioning becomes more important than collecting additional loot. Look for defensible buildings, useful cover, and routes that allow your squad to move without exposing everyone at once.
Wolves Stadium and The Grid can offer useful central positioning, but central does not automatically mean safe. Open approaches and third-party engagements can still punish teams that move without checking their surroundings.
Our advice is to avoid committing to a fight simply because an opponent is visible. Consider your available cover, remaining resources, and the next safe-zone movement before engaging.
Common Landing Mistakes to Avoid
Even a strong POI can become a poor choice if your squad approaches it without a plan. These are the mistakes we recommend avoiding on Hajin.
- Following every hot drop: Popular locations attract competition. If your team is not prepared for immediate combat, choose a less contested area.
- Ignoring the first circle: Spending too long looting an isolated location can leave you with limited rotation options.
- Running across open ground: Farmland and waterfront areas can expose players to long-range fire. Use available cover whenever possible.
- Splitting up too far: A separated teammate is easier to isolate, especially during the opening fights.
- Over-looting: Once your squad has suitable weapons, armor, and supplies, continuing to search every building may not be worth the time.
- Taking unnecessary fights: Not every encounter needs to become a full squad engagement. Sometimes repositioning is the smarter decision.
We have found that consistency matters more than chasing a perfect opening. A reasonable landing, coordinated looting, and an early rotation usually give your squad more control over the match.
Summary
The best Hajin drop location depends on your preferred playstyle, squad size, and the first circle. Hajin City is our top overall recommendation because it combines strong loot opportunities, substantial cover, and flexible routes. The Grid is better suited to squads looking for immediate action, while Mirae General Hospital and Imjin Farmland offer practical alternatives for players who prefer a more controlled start.
Before jumping, check the circle and decide what your team wants from the opening minutes. Secure essential equipment, avoid unnecessary exposure, and leave isolated locations early when the zone demands it. These habits will help you make better decisions throughout the match.
FAQ
What Is the Best Overall Drop Location on Hajin?
Hajin City is the best all-around choice for its dense buildings, loot opportunities, and multiple rotation routes. Landing on the outskirts instead of directly in the busiest district can help your squad prepare before engaging other teams.
What Is the Safest Place to Land on Hajin?
Imjin Farmland is a reasonable choice for a quieter start, with decent loot and fewer concentrated fights. However, its open terrain and long sightlines mean you still need to use buildings, fences, and vehicles for cover.
Where Should Solo Players Land on Hajin?
Mirae General Hospital is one of the strongest options for solo players because its compact layout and indoor cover make it easier to secure basic equipment. Songdo Wharf and Cheongun Village are also worth considering.
Is The Grid Worth Landing At?
Yes, if your squad is comfortable with early combat. The Grid offers high-tier loot potential and a central position, but its popularity means you should expect competition. Land on the outskirts, gear up, and push inward when ready.
When Should You Rotate After Landing?
Start planning your rotation as soon as you have essential weapons, armor, and supplies. If your POI is far from the first circle, leave early rather than waiting until the gas forces your team into an exposed route.
Does This Guide Cover MW4 DMZ Progression?
No. This guide focuses specifically on Battle Royale landing locations and rotation strategies on Hajin. DMZ has different objectives, loot priorities, and extraction mechanics. Players looking for separate gear-related resources can explore cheap CoD MW4 DMZ Items, but those resources do not replace the positioning and survival strategies discussed here.