Cart Empty
Continue ShoppingPoE 2 Patch 0.5 Added new defence: Runic Ward. This defence kicks in once you reach 1 life allowing you to continue to survive while your Runic Ward takes damage. Runic Ward regenerates independently of your life.
Runic Ward is a last line of protection, absorbing fatal damage instead of your Life. If you take damage that would cause your Life to reach 0 while you have Runic Ward, you will drop to 1 Life and your Runic Ward will take the remaining damage. You will still die if you do not have enough Runic Ward to absorb the remaining damage. Runic Ward does not protect against Life loss that is not caused by taking damage.
Runic Ward constantly regenerates at a default rate of 5% per second.
Monsters can also have Runic Ward. While a monster has Runic Ward, it cannot be Culled.
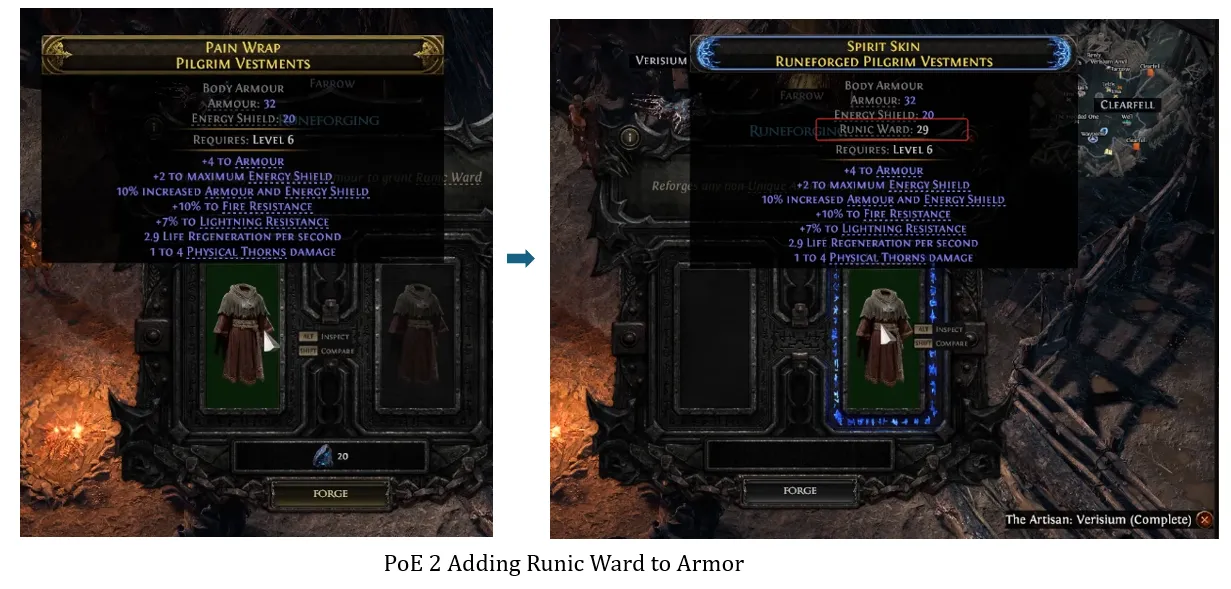
You can spend Verisium to add Runic Ward to your defense.

| Name | Description |
|---|---|
| Emergent Possibility | Boots: 50% increased Runic Ward Regeneration Rate while Sprinting |
| Lesser Ward Rune | Armour: +15 to maximum Runic Ward |
| Ward Rune | Armour: +20 to maximum Runic Ward |
| Greater Ward Rune | Armour: +25 to maximum Runic Ward |
| Perfect Ward Rune | Armour: +30 to maximum Runic Ward |
| Lesser Charging Rune | Armour: 8% increased Runic Ward Regeneration Rate |
| Charging Rune | Armour: 12% increased Runic Ward Regeneration Rate |
| Greater Charging Rune | Armour: 16% increased Runic Ward Regeneration Rate |
| Perfect Charging Rune | Armour: 20% increased Runic Ward Regeneration Rate |
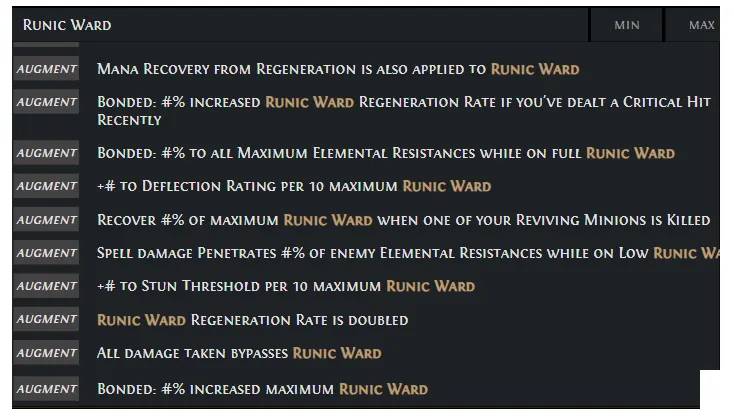
| Warding Rune of Reinforcement | Armour: 20% increased Runic Ward |
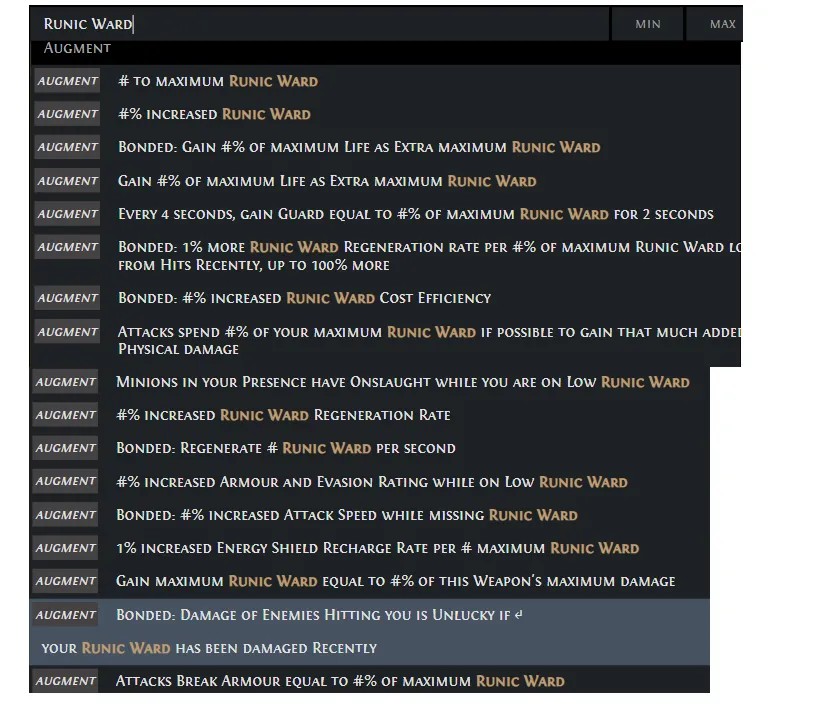
| Warding Rune of Protection | Armour: Every 4 seconds, gain Guard equal to 20% of maximum Runic Ward for 2 seconds |
| Warding Rune of Disintegration | Martial Weapon: Attacks Break Armour equal to 15% of maximum Runic Ward |
| Warding Rune of Symbiosis | Boots: 1% increased Energy Shield Recharge Rate per 30 maximum Runic Ward |
| Warding Rune of Stability | Shields and Bucklers: +4 to Stun Threshold per 10 maximum Runic Ward |
| Warding Rune of Glancing | Body Armours: +3 to Deflection Rating per 10 maximum Runic Ward |
| Warding Rune of Heart | Body Armours: Gain 5% of maximum Life as Extra maximum Runic Ward |
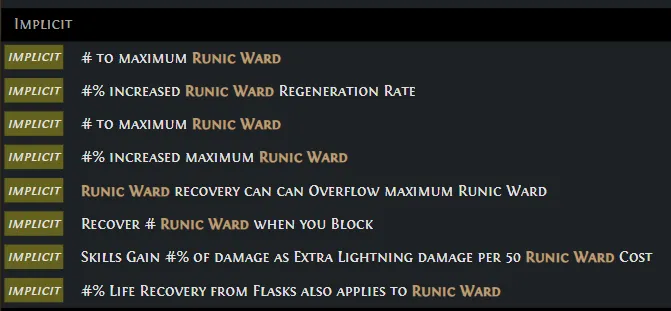
| Warding Rune of Nourishment | Armour: 15% Life Recovery from Flasks also applies to Runic Ward |
| Warding Rune of Annihilation | Martial Weapon: Attacks spend 5% of your maximum Runic Ward if possible to gain that much added Physical damage |
| Warding Rune of Armature | Martial Weapon: Gain maximum Runic Ward equal to 15% of this Weapon's maximum damage |
| Warding Rune of Obsession | Wands: All damage taken bypasses Runic Ward, Runic Ward Regeneration Rate is doubled |
| Warding Rune of Equinox | Caster Weapon: 40% less Mana Regeneration Rate, Mana Recovery from Regeneration is also applied to Runic Ward |
| Warding Rune of Salvaging | Sceptres: Recover 3% of maximum Runic Ward when one of your Reviving Minions is Killed |
| Warding Rune of Hollowing | Caster Weapon: Gain 15% of maximum Life as Extra maximum Runic Ward, 15% less maximum Life |
| Name | Category | Description |
|---|---|---|
| Runemastered Torment Club | One Hand Maces | Skills Gain (4—6)% of damage as Extra Lightning damage per 50 Runic Ward Cost |
| Runemastered Runic Fork | Wands | +300 to maximum Runic Ward |
| Runeforged Kalguuran Forgehammer | One Hand Maces | +(100—150) to maximum Runic Ward |
| Warding Quarterstaff | Quarterstaves | +(30—50) to maximum Runic Ward |
| Runemastered Warding Quarterstaff | Quarterstaves | +(30—50) to maximum Runic Ward |
| Name | Category | Description |
|---|---|---|
| Svalinn Crucible Tower Shield | Kalguuran Shields | +(50—100) to maximum Runic Ward |
| Runemastered Crucible Tower Shield | Shields | Recover (15—25) Runic Ward when you Block |
| Runemastered Heavy Belt | Belts | (15—25)% Life Recovery from Flasks also applies to Runic Ward |
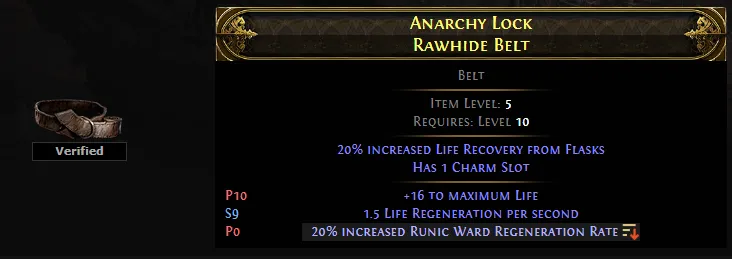
| Runemastered Heavy Belt | Belts | (20—40)% increased Runic Ward Regeneration Rate |
| Runemastered Heavy Belt | Belts | Runic Ward recovery can can Overflow maximum Runic Ward |
| Runeforged Fists of Stone | Gloves | Has +1 to maximum Runic Ward per player level |
| Runeforged Champion Cuirass | Body Armours | +(750—1000) to maximum Runic Ward |
| Runeforged Flowing Raiment | Body Armours | (30—40)% increased Runic Ward Regeneration Rate |
| Runemastered Spiritbone Crown | Helmets | (25—50)% increased Runic Ward Regeneration Rate |
| Name | Category | Description |
|---|---|---|
| Veridical Chain | Amulets | +(30—40) to maximum Runic Ward |
| Runemastered Veridical Chain | Amulets | +(30—40) to maximum Runic Ward |
| Name | Description |
|---|---|
| Olroth's Resolve Ultimate Life Flask | Regenerate (2.5—5)% of maximum Runic Ward per second during Effect Gain Guard equal to Current Runic Ward for 10 seconds when Effect ends |
| Uhtred's Chalice Transcendent Mana Flask | Lose 5% Life per second while you have no Runic Ward during Effect |
| Name | Description |
|---|---|
| Runic Alloy | Removes a random modifier and augments a Rare item with a new guaranteed modifier Ring: +(37—49) to maximum Runic Ward Amulet: (6—10)% increased maximum Runic Ward Belt: (15—20)% increased Runic Ward Regeneration Rate |
| Adaptive Alloy | Removes a random modifier and augments a Rare item with a new guaranteed modifier Staff: Gain (42—52)% of Damage as Extra Fire Damage while you are missing Runic Ward Wand: Gain (21—26)% of Damage as Extra Fire Damage while you are missing Runic Ward Sceptre: (30—50)% Surpassing Chance to gain a Puppet Master stack whenever you use a Command Skill Gloves: (10—15)% increased Attack Speed while missing Runic Ward |
| Protective Alloy | Removes a random modifier and augments a Rare item with a new guaranteed modifier Belt: Recover (32—45) Runic Ward when a Charm is used Weapons: +(51—74) to maximum Runic Ward Shield: Recover (10—15) Runic Ward when you Block |
| Sovereign Alloy | Removes a random modifier and augments a Rare item with a new guaranteed modifier Weapons: (20—30)% increased effect of Socketed Augment Items Armour: (24—30)% increased Runic Ward Jewellery or Belt: (20—30)% increased Explicit Resistance Modifier magnitudes |
Whether you are targeting Runic Alloys to bolster your ward defenses or Sovereign Alloys to maximize your modifier magnitudes, min-maxing your gear in Path of Exile 2 requires an immense amount of crafting resources. Instead of spending countless hours grinding RNG drops, you can instantly secure all the crafting materials, keys, and chaos you need right here. Skip the tedious farm, perfect your endgame build today, and buy cheap PoE 2 Currency directly from our secure platform with fast delivery and competitive rates.
| Name | Description |
|---|---|
| Concussive Runes | Support, Attack, AoE, Melee, Slam, Trigger Supports Attacks, causing a Runic Shockwave to erupt under enemies they Heavy Stun. The Shockwave costs Runic Ward, and will not Trigger if you do not have enough Runic Ward. |
| Leylines | Buff, Persistent, AoE, Duration While active, areas of intense runic energy are revealed to you. Standing over them grants you a powerful Spell damage boost but constantly drains your Runic Ward. Running out of Runic Ward causes the energy to temporarily dissipate. |
| Hollow Shell | Spell, Buff, AoE, Nova Sacrifice your Runic Ward to send out an energy pulse that grants nearby Allies Guard. |
| Runic Infusion | Support, Attack, Physical Supports Attacks you use or Trigger yourself, causing them to cost Runic Ward to use but deal additional Physical damage based on their Runic Ward cost. Cannot Support Channelling Skills, Sustained Skills, or Skills without a cost. |
| Runeforged Blades | Support, Attack, Projectile, Trigger, Payoff Supports Attacks you use yourself, causing them to Consume Fully Broken Armour on enemies to fire a nova of runic Projectiles at the cost of Runic Ward. The Projectiles cannot Hit the enemy from which they originated. Cannot support skills that Consume Broken Armour. |
| Powered by Verisium | Spell, Repeatable Spends Ward to generate Verisium Infusions, which can be used in place of any Elemental Infusions. |
| Refutation | Buff, Spell, Duration, Repeatable Spends all your Ward to gain a short-duration Buff that causes you to Block all Blockable Hits and apply Parried to enemies from which you've Blocked a Hit. This Buff is removed if you are Heavy Stunned. While this Buff is active, you cannot be Light Stunned, but Blocking too much damage may Heavy Stun you. |
| Skyfall | Spell, Minion, AoE, Physical, Cold, Conditional, Repeatable Build Glory by spending Runic Ward. When you have maximum Glory, you may call down a mass of Verisium from the sky, dealing high damage at the targeted location and summoning a Temporary Minion. Targeting close to you will cause you to jump back as you cast. Consumes a Verisium Infusion, if possible, to increase the number of Minions summoned . |
| Animus Exchange | Spell Sacrifice a portion of your Life to recover Runic Ward. Runic Ward recovered by this Skill can Overflow. |
| Bitter Dead | Spell, AoE, Cold, Repeatable Spend Ward and target an area, transforming Corpses into bitter cores that seek out enemies and Chill enemies near them. The cores explode at the end of their duration, creating runes which deal additional Cold damage over time. |
| Eternal March | Spell, Minion Spend Runic Ward to instantly Revive your Minions. Prioritises the most powerful minions first. |
| Grim Pillars | Spell, AoE, Cold, Duration, Nova Spend Runic Ward to cause damaging Ice-Crystal spears to erupt from the ground around you. These spears can be destroyed for an explosion of Cold damage. |
| Verisium Manifestations | Buff, Minion, Persistent, Duration While active, Hitting with an Attack will spend Runic Ward to summon a Verisium Manifestation, a short-lived Temporary Minion that rapidly Attacks nearby enemies, ignoring commands. Enemies will not directly engage these Minions, and can pass through them. |
| Remnants of Kalguur | Buff, Persistent, Remnant While active, enemies you Stun or kill have a chance to generate a Runic Ward Remnant. These Remnants can Overflow your Runic Ward. |
| Runic Extraction | Support, Remnant Supports any Skill that deals damage. Enemies you kill with supported Skills have a chance to drop a Verisium Infusion Remnant. |
| Wardbound Minions | Spell, Minion, Duration, Repeatable Spend all your Runic Ward to summon Temporary Wardbound Casters. These Minions target nearby enemies with damaging Cold Spells. |
| Fragments Of The Past | Attack, AoE, Projectile, Trigger, Sustained, Cold, Duration Spend Runic Ward to create a Verisium volcano that deals damage on initial eruption and Triggers Ice Fragments. |
| Conductive Runes | Attack, AoE, Lightning, Duration, Hazard Spend Runic Ward to create a number of Hazardous Runes in a cone in front of you, which arm after a time. After arming, these Runes will activate when enemies step on them, exploding to deal Attack damage and apply Electrocution buildup. |
| Animus Splinters | Meta Expend a large amount of Runic Ward to instantly create a short-lived copy of yourself that uses a Socketed Skill once, then vanishes. This Skill's cost is equal to the total cost of Socketed Skills. The copy cannot perform Channelled, Remote, Cooldown or Conditional Skills, or summon Minions. |
| Scouring Flame | Support, Fire Supports any skill that Hits enemies, causing inflicted Ignites to deal more damage but the skill to gain a Runic Ward cost. |
| Runic Reprieve | Spell, Channelling Channel to create a protective bubble all around you, Blocking Hits against you. While Channelling this Skill, you cannot be Light Stunned by Hits you Block, and damage you take from Hits is also removed from Runic Ward. Blocking Hits this way causes you to accumulate Heavy Stun buildup. You cannot recover Runic Ward while this Skill is active. |
| Fist Of Kalguur | Support, Attack, AoE, Melee, Slam, Trigger, Physical, Duration Supports Slams you use yourself, allowing them to spend large amounts of Runic Ward to become Runically Boosted. Runically Boosted Slams are Empowered with extra Physical damage and create a rune the first time they hit an enemy. The rune erupts in an Aftershock after a duration. Cannot support Channelling Skills. |
| Healing Runes | Support, Buff, Persistent Supports Persistent Buff Skills, causing you to lose Runic Ward and heal nearby allies based on the Ward lost. Healing done is split between allies who are not on full Life. |
| Olroth's Conviction | Support, Lineage Supports skills that can Empower a specific number of other skills, causing them to apply to more skill uses. |
| Rain of Blades | Attack, Buff, AoE, Trigger, Duration Pour your Runic Ward into conjuring blades. For the duration of the Buff, these blades fall on enemies Hit by your Projectile Attacks. |
| Olroth's Hubris | Support, Lineage Supports Attacks you use or Trigger yourself, causing them to cost Runic Ward to use but deal additional Physical and Cold damage based on their Runic Ward cost, in addition to causing Physical damage to Contribute to Freeze buildup. Cannot Support Channelling Skills, Sustained Skills, or Skills without a cost. |
Quality grants small bonuses to an item depending on the type of item, up to a default maximum of 20%.
Martial Weapons gain 1% more Physical damage per Quality.
Armours gain 1% more Armour, Evasion, Energy Shield and Runic Ward per Quality.
Rings and Amulets have a number of possible quality types that provide bonuses to specific modifiers on the item.
Flasks gain 1% more Life and Mana recovery per Quality.
Charms gain 1% increased duration per Quality.
Skill Gems or equipment that grant Skills grant a specific bonus to their Skill based on their Quality.
Honour is an additional resource you have to manage within the Trial of the Sekhemas. A percentage of the damage you take from enemies in the Trial will be taken from your Honour. If your Honour reaches zero then the Trial is failed.
Your starting and maximum Honour are the sum of your maximum Life, Energy Shield and Runic Ward. Your maximum Mana is also added if you have [passive_keystone_mind_over_matter|Mind Over Matter].
The U4N Editorial Team is made up of dedicated gamers and technical experts. We're not just a trusted marketplace for game assets—we're all about empowering players with top-tier, expert-driven content. Our team produces in-depth guides, strategies, and technical fixes for some of the biggest games out there, like MLB The Show 26, Aion 2, Forza Horizon 6, Arc Raiders, and Path of Exile.
Whether it's mastering market flipping in Diamond Dynasty or optimizing your endgame builds, all of our strategies are tested and proven by in-house experts. At U4N, we don't just follow the meta—we help you stay ahead of it.