Cart Empty
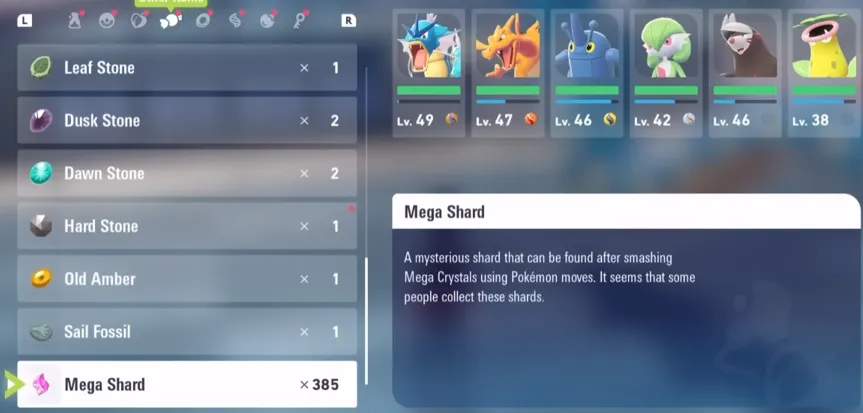
Continue ShoppingIf you plan to Mega Evolve more than a couple of teammates, you're going to need a mountain of Mega Shards. The game quietly teaches the basics (break pink “Mega Crystals,” get Shards), but it doesn't explain the best places, the right moves, or how to multiply your gains. Here's a clean, practical route from a player who made too many laps around Lumiose's rooftops.
Early in the story you'll start finding Colorful Screws (purple orbs). Trade these at Racen's Construction (bottom-right of the city) for Canary plush upgrades:
If you're more focused on team strength than farming routes, you can always buy Shiny Pokemon Legends ZA options from trusted player markets to round out your lineup. This lets you skip the grind and jump straight into hunting Mega Crystals with a fully optimized squad. It's a quick way to turn your farming runs into efficient, high-reward sessions.
No spoilers beyond place names and “there are crystals here.” If you're super sensitive to exploration spoilers, skip this section.
1) Hotel Z Rooftops (Central City)
A great early loop. Scale the long ladder, hop the connected roofs, and you'll usually hit multiple clusters on one terrace. Not the densest in the game, but very accessible and quick to clear.
2) Wild Zone 9 – Construction Rooftops
Enter the scaffolded complex, climb the very tall ladder to the top. There are two strong pockets of crystals on adjacent roofs; AoE shines here. Don't waste time poking every ledge—the main platform pays best.
3) Prism Tower Perimeter (Early Game Window)
Before late-game changes around the tower, the outer walls have scattered clumps you can pick along a single lap. If you're post-game and geometry changes removed your route, skip this and focus on #2 and #4.
4) Northwestern Restaurant Walls (City's NW block)
A sleeper hotspot. The outer walls and corners are loaded with nodes. With good movement (bunny-hopping up trim and ledges), you can vacuum a big haul in minutes. Great place to end a loop before switching to battles.
General rule of thumb: rooftops beat streets. If you can see a network of connected roofs or perimeter walls, there's a good chance the designers tucked several nodes up there.
This loop keeps Shards flowing while also feeding your wallet and combat tickets—zero idle time.
Note: A subset of stones are purchasable at the Stone Emporium for PokeDollars (think ~50k → 100k+ each). That's why the side-loop for money matters—mix Shards and cash to accelerate the set.
Do crystals scale with story progress or time of day?
Story gates access to certain rooftops/zones, but Shard yield is driven by your Pink Canary level and the clump sizes you hit—not the clock.
Does Gold Canary help with Shards?
No. Gold = prize money from battles only. For Shards, upgrade Pink.
Can I force respawns by reloading or bench resting?
No. Treat it as a live timer. Clear a cluster, go do something else, come back.
What moves should I teach for AoE clears?
Earthquake is king when terrain allows. Rock Slide, Razor Leaf, and similar spread moves are good backups. Keep one fast single-target button for isolated nodes.
The U4N Editorial Team is made up of dedicated gamers and technical experts. We're not just a trusted marketplace for game assets—we're all about empowering players with top-tier, expert-driven content. Our team produces in-depth guides, strategies, and technical fixes for some of the biggest games out there, like MLB The Show 26, Aion 2, Forza Horizon 6, Arc Raiders, and Path of Exile.
Whether it's mastering market flipping in Diamond Dynasty or optimizing your endgame builds, all of our strategies are tested and proven by in-house experts. At U4N, we don't just follow the meta—we help you stay ahead of it.